
We’ve all seen the cool go kart with Bud Lite printed on the side of it and a guy driving around in it. It looks really cool like a race car, because it has a fiberglass body on it. The question is how do you make a fiberglass body like that?
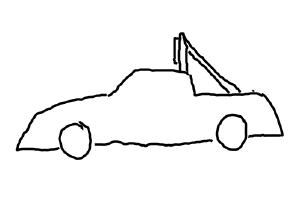
Typical Go kart Body: Pick-up truck style
There are two ways to make a fiberglass body:
1.) Free Hand Molded Body
2.) Mold body
In this article were going to discuss the merits of both types of go kart bodies. Each one of the body styles has their own merits, and each one has their own costs associated with it. The lowest cost version being the freehand body style. The most costly obviously being the molded body style.
To understand how fiberglass works first of all we need to discuss fiberglass and its process. First of all fiberglass is just the glass fibers made into a mat overlaid with a resin. The resin is mixed with an activator which causes a chemical reaction within the resin. The resin will be liquid for a matter of a few minutes then it will convert into a more solid state. Eventually the resin/fiberglass mixture becoming very hard as a chemical reaction causes the material to harden.
Because the resin is a liquid and then turns into a hardened solid the surface that the liquid rests on will be duplicated or mirrored. For example if you set a piece of fiberglass on a leaf and then coat it with resin, let it harden and then pick up the hardened piece of fiberglass section the underside will have the leaf impression on it.
The freehand method basically uses a low-cost mold generated out of plywood and drywall compound. Remember that the surface finish is duplicated by the resin. Any defects in the mold will be mirrored onto the body design.
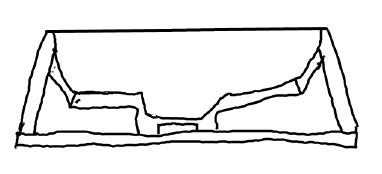
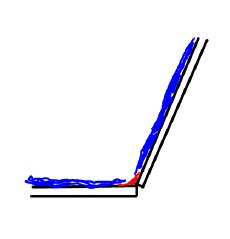
To generate the body for the go kart, design the body shape on paper. Then generate a top mold using plywood and two by fours. The resulting body mold will look like a big tub. An important note about mold design: the walls of the mold must be designed with a draft or angled walls so that when the fiberglass hardens, it is easier to remove from the mold. The best way to explain this is to examine a popsicle mold or an ice cube tray.
The ice cube’s basically are liquid when they start out and then they become hardened solid ice. The shape of the ice will duplicate the shape of the mold. However, the shape of the mold has drafted or angled sides to it so that the ice pops out when you twist the ice tray. The same goes for the popsicle mold. The popsicle mold has angled sides to it so that the popsicle will pop out easily. The same kind of thinking goes into the body mold. When the liquid resin has hardened it will be very much like ice, except not cold, and will be difficult to remove unless the sides of the mold our angled.
So I’m mentioning the angling of the sides of the mold now so that we don’t develop a body style that has no draft to it. Additionally, the mold cannot have any under cuts in it. An undercut is any section of the mold where there is a pocket or a ledge. The best way to understand this is to realize that when you pull something out of an and closure that it cannot have any hangups.
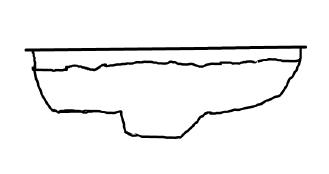
Basic Go Kart Body Mold. Draft and extra material are needed. The mold sits so that the body would be upside down, like a tub.
An example of this would be the monkey trying to pull his hand out of a cookie jar. The monkey cannot pull his hand out of the cookie jar because his hand is bigger than the mouth of the cookie jar, especially when there’s a cookie in his hand. In order for the monkey to get his hand out of the cookie jar his hand must be the same size as the mouth of the cookie jar. If you think about it, the cookie jar with the small top mouth could not be molded with something inside it. It had to have an external mold on it and the material would have then been pressed into the mold using centrifugal force or air.
But that aside, the concept of undercut should be understood, and that the body shape should easily be removed from the mold by just pulling on the body. It should just pop out of a mold once it has been hardened.
Developing The Body Mold
Now that we understand how the mold actually is designed the development of the mold shape should be understood as well. The best way to develop the body shape is to first of all drawn onto a scale model piece of paper. The body shape will then be drawn in a 2-D shape from the side and a 2-D shape from the front and a 2-D shape from the back. Using this information this will be a guide to the basic overall body shape. Remember, the actual mold will be the outside of the body. So any would patterns that you develop will be the body shape on the outside, not the inside.
You can develop a mold from the inside, which is possible, however the surface finish will be very bumpy. An example of the surface finish would be to look under your kitchen counter and to examine the very rough finish that is under there. Or another example would be to look underneath your bathtub and see the very rough surface finish up there. The bathtubs and shower stalls and so forth are developed using the molding process that were discussing here.
The mold we are developing here will technically be called a female mold. Meaning, we’re making a large tub. The structure of the tub will be on the outside and use whatever necessary to make the tub strong enough so that it can be manhandled. The resulting weight of the mold will be around 60 to 70 pounds, depending on how large the body is.
Built Up Go Kart Body Mold
Use 3/8 inch plywood; the finer the finished the better or the least amount work that you’ll need to do with the drywall compound.
Once you develop the body shape using the plywood fill in all the corners using quick set 20 minute or 90 minute drywall compound. Use the quick set type style material which turns and almost into rock. A word of note, make sure that you understand that any overdoing of the drywall compound will have to be sanded out so make sure that you are constantly under doing it because you can always add material later.
Now that you have drywall compound at all the corners, make sure you use your rounded finger or two rounded corners then the final coat of material can be added. The material be smeared on all the plywood and fill in all crevices make sure that the thickness of the materials about a 16th to eighth inch thick. As you can see we are a 16th and eighth of an inch smaller than the original body shape design. So you may want make that decision before you start finalizing your mold design understanding that the actual mold will be coated with some material and will make the actual body size a little bit smaller than your intended design. I personally wouldn’t worry about it because you’re developing a body that really should have a plus or minus (±) tolerance of a quarter of an inch anyway.
Now comes the fun part, sand, sand, re-sand, drywall compound and final sand. A word of note about fasteners and drywall compound. Drywall compound will cause itself the bump out on drywall screws or nails. Or the inverse can happen especially if you recessed fastner: the drywall compound will sink into the recessed area. Understand this before you start. Pre-drywall all the fastener places before you start putting on the final coats of drywall compound.
Fill in the corners, or round out the corners of the mold. Sharp corners cause bubbles to form and create stress risers.
Also, you may want to put some primer on the plywood so that the drywall compound does not peel away.
A word of note about sharp corners and a mold. Sharp corners are not a good idea and all corners should be rounded. The reason for this is that stress risers will develop in the sharp corners and bubbles will develop as well. Try to keep at least a half an inch round to a 1 inch round on each corner in the mold. This will make a more uniform part thickness and will keep the bubbles down in those areas.
Use Of The Go Kart Body Mold
Once the mold is finalized and the surface finish inside the mold has been completed to your satisfaction, remembering that any surface defect will show up on the part, take some turtle wax or car buffing wax and coat the hole inside of the mold. The drywall compound will soak up this wax so be sure to coat it several times. The purpose of this wax is to allow the body part to come free from the mold easily. If you do not use this wax the part will become bonded to the drywall compound and you will have a huge mess. Do not use silicone spray or coat the inside of the mold with oil; that’s another disaster waiting to happen. Coat the inside of the mold with wax and then buff the inside of the tool with a cloth or buffing tool.
Remember this is a freehand tool and if you’re expecting high high quality parts to come off of this tool you may be disappointed. The amount of effort that you throw into your mold will pay in the end as far as how well the part looks in the end. Any surface defects in the part can be corrected after the part has been molded; so don’t look at the tool is being absolute. Allow yourself some leeway and understand the part will not come out perfect but may need to be finalized and perfected later.
Making Go Kart Body Parts
A word of note: You may want to put some holes inside your mold that can be hit with an air gun so the part can be freed later. The air holes shouldn’t be much larger than 1/16 and 1/8th of an inch.
To make the body go to a body shop or to an auto parts store and buy the cloth needed for your body shape. A rule of thumb: you want to have the body thickness about an eighth of an inch thick at the maximum. Any thicker and it’s just too robust and could get heavy.
You will need at least three plies of thickness to get the desired body thickness. To approximate the amount of fiberglass matting required, measure the inside of the walls as if it were a box. Add all the areas together and multiply by 1.25. This will be the area required for one layer. Multiply this final area by three (3) and this will be the amount of matting required for the final body shape.
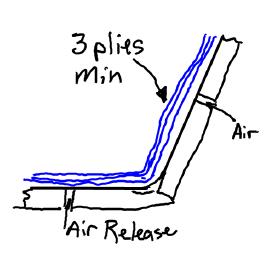
Laying up the plies. Use at least three plies of fiberglass. The body should be at least 1/8 at the very minimum for strength.
The amount of resin required will be the area multiplied by .188. This will be the body in the cubic inches or volume. Divide this by and by 231 in.³ per gallon and this will give you how many gallons of resin needed. Consult the resin instructions for the amount of activator required. Typically several drops are needed per batch, so the amount of activator may be at least five little tubes.
The type of fiberglass matting is relative to your budget. A freestyle random matt is stronger than uniform matting. The uniform matting is more prone to cracking, whereas the random matting has a less predictable or stress-related design. Often the random matting is cheaper.
Basically what you want to do is coat the inside of the tool with resin using an expendable paint brush, then start applying the cloth. Then apply the resin on top of a cloth and let it dry. Perform the next two layers using the same process.
You can wait 20 minutes between during times to apply the layers. Let all the layers set for 24 hours and then removes apart from the mold.
When you are applying the plies to the mold make sure that you have an inch of scrap area on the top of the mold. In other words you have a ledge or a rim of material at the very top of the mold. This will serve as something to grab onto when you want to pull the part out from the mold. Keep in mind you will have to cut this excess away when done. This may become a very tricky part of the process cutting away the rim section. A simple utility knife may not work here.
When you’re cutting the material away keep in mind the whole part may rattle. That for will wreck the body or crack it. So the ideal way to remove the rim section is to cut it using a very gentle methods such as a circular saw. Or hold onto it so it doesn’t vibrate the part when you are cutting it. If you do need to use something like a sawsall or reciprocating saw, make sure you feed it through the part very slowly and support the body shape with boards on either side so it is not rattle and vibrate excessively.
Removing The Go Kart Body From The Mold
To remove the part from the mold find each hole that you drilled for the air release and take an air gun and put it up to the hole. Be sure to start at the very bottom of the tool and work towards the sides. If you put ample wax on the mold it might just pop right out. Use the rim section around the top of the tool and pry is loose with screw drivers to further remove the part.
Once you have removed body from the mold examine the surface for bubbles and defects. You’ll need to fill in these areas with body filler or with some more fiberglass compound resin. Use a very fine sandpaper and wet sand the surface.
Painting The Go Kart Body
Prime the body with professional autobody primer. Be sure to wet sand defects. Obviously, use a professional paint sprayer to finalize the body painting schemes.
What we just discussed was the freehand method to develop a body mold.
The body mold system, actually uses a more complex mold. The actual developing of this tool is through numerous fiberglass applications and surface developments. The actual development of tools of this nature are beyond the scope of this article. However it is adequate to understand that fiberglass is actually used to develop these molds and that the surface finishes are developed using similar methods to that of fixing body panels on cars. It is very labor intensive, more intensive than the mold that we developed using basic everyday materials.
The go kart body mold we develop should be a able to pull 10 or even more parts.
So to recap:
– Develop Your Body Shape Using A Scale Model
– Fabricate A Plywood Mold And Coat It With Drywall Compound And Wax
– Apply At Least Three Or Four Thicknesses Of Fiberglass Layers
– Pull The Part 24 Hours Later
– Put The Finishing Touches On The Part
– Prime
– Paint
– Mount To Your Go Kart
Go Kart Body Building Safety Considerations
Caution should be used when using fiberglass. First of all fiberglass is little pieces of glass that are about a hair in diameter. They are very sharp and act like little needles in your skin.
Additionally the dust from sanding can get into your lungs and will not dissolve and go away. You can get a serious illnesses when working with fiberglass. Be sure to wear face masks, and rubber gloves when using fiberglass.
The resin is very smelly, and it’s very hard and sharp. When sanding the resin of the dust itself is not good for you either. Be aware that any rubber glove that you use will be rendered useless after you have been playing around with fiberglass. What I do is I buy throwaway rubber gloves and use the pair up every time I activate a resin batch.
To get the resin/fiberglass off of your skin is very difficult. Use of acetone and caustic chemicals is required.
So be sure to understand what you’re getting into when you’re working with fiberglass. Wear the proper clothing: expect it to be thrown away or rendered useless as well when you’re done with it.
Additionally invest in some good face masks and rubber gloves. Be sure that people who are around are not breathing the air when you’re sanding.
Remember dust goes into air ducts, so it is a terrible (emphasis on terrible) idea to be doing fiberglass in the house, or even in the basement. The fiberglass will be distributed throughout your house and you will have sick people.
Always follow safety precautions and understand that fiberglass is dangerous and needs to be handled with respect and care.
Disclaimer
This is only a commentary on making bodies for go kart’s. Any injuries resulting from a body shape or sharp edges from body parts is not to be misconstrued as a direct recommendation or result from this article. Use of common sense and proper safety measures is required, this is only a commentary on body molds and the molding process. Any misuse, and injuries that may result from your misapplication of fiberglass or body design is not Gamble Industries LLC liability or responsibility. A body is not to be misconstrued as a frame or a roll bar.


[…] been using the fiberglass tool article that I wrote as a baseline for the design of my tools. It has been quite a successful project, a […]
Hi, i really found this help full. and very informative, every
thing about it, and this was the only one on this website that was easy to read, and i understood every bit of it, not just parts of it, and i didn’t have to read it over and over to understand it, so great job, . Richard.