 |
 |
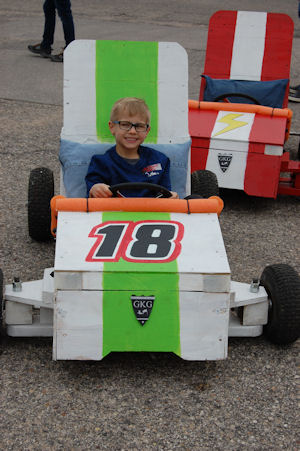
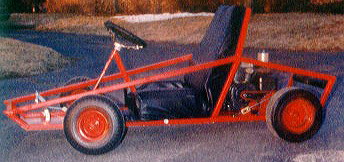
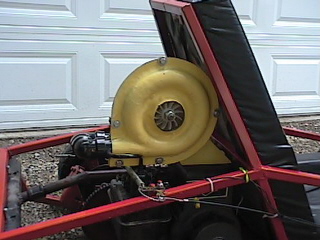
| Go Kart Plans Available with full prints…. | Go Kart Shown With Accessory Package Front Air Dam and Rear Spoiler. Visit our Accessories pages for details…. |
 Go Kart Plan Go Kart Plan
There are several different styles of go karts and plans they are: -Flat Go Kart These different types of go karts can range from Steel tubing, wood, PVC pipe and fiberglass construction. On this web page we specialize in metal frame go karts and wood go karts. Go Kart Plans can be developed by yourself, or purchased through various web pages, including this one. There are pro’s and cons to the different styles mentioned about. The differences to the frames designs typically are cost, comfort and safety.
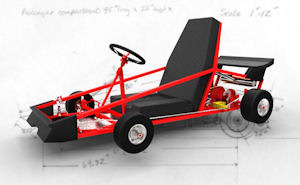
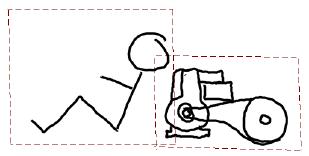
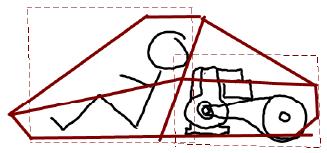
Read the following to learn how to develop your own go kart plan. Developing a Go Kart PlanFirst of all when developing a go kart plan you need to decide how many people are going to be sitting in it. Secondly you need to determine where it is going to be driven Thirdly, from that information you need to perform a power calculation to determine if the clutch is going to smoke or not. Fourthly, for good go kart performance you need, regardless of the go kart type (whether it is wood, or full suspension with roll cage) you need to have the center of gravity figured out and put in the right spot. Fifthly, once the center of gravity has been determined, you need to figure out the steering positioning, ie steering wheel position, and foot pedal positioning. The above five point process if followed in order, will help keep the costs, and rework headaches down. So lets go through each of the steps and how a go kart frame would be developed. Determining Number of RidersTypically, a go kart is designed for one rider, however there are many go karts that seat two people. So make sure you answer that question first. The reason why I stress this is that if you have other people who are interested in the go kart, but are too young to ride it, then you may want to consider multiple seater go kart. A multiple seater has its own set of problems, namely: 1. How do you transport it? The go kart needs to be able to fit inside a trailer, or the back of a pick up truck. If the go kart is too wide, it will not fit and you will be stuck with not being able to bring it places. 2. The width of the go kart is important for stability. If the go kart is too thin, the go kart can flip easily. The ratio between the height of the center of gravity and the width of the go kart should be at least: 2.25 to 1. For a center of gravity height of 18 inches, the go kart should be 40 inches wide. So the complexity comes in with a go kart of seating two people. For a two seater the height of the center of gravity may increase to about 25 inches, making the width needed to be 55 at the minimum. 3. Finding components that are going to work on a two seater. For example, a live axel may be tough to find. Be aware of this before you start committing resources. Developing the Go Kart Frame DesignGo kart frames can range from simple to complex, but the consistent element to all the frames, an engine and a person needs to fit inside the frame work. So to start, develop a person space, and an engine space. I typically put together a scale model on paper of the shapes and then fit them together on the sketch. The person space typically does not overlap the engine space too much, unless the seat is angling back and allowing the engine to fit in this space. The frame can be rough sketched from the side to include the guy and the engine. Make at least 5 different sketches, show them to your friends and determine the shape you like. The final shape you choose will be the starting point for the go kart frame design. This will be the basis for your go kart plan. Place the wheels into the go kart and see how it looks. Now this may seem all simple, but now comes the more sophisticated part. Don’t be snowed by this, all we are doing now is two things:
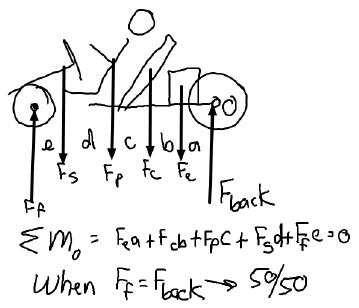
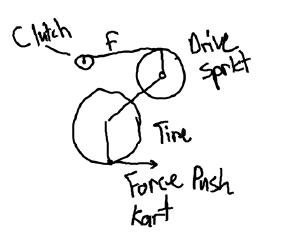
Determining Where the Center of Gravity Should BeThe ideal center of gravity for a go kart is a 50-50 weight distribution. What this means is that the weight of the go kart is the same for both the front wheels and the back wheels. Put simply the line of action for the go kart is in the center point between the wheel placement on the go kart. Typically the person placement is right in the center of gravity zone. Sometimes on small go karts used for racing they will actually add weight to balance out the go kart competition weight (obviously so there is no advantage to have more weight or less weight) however one of the side benefits is that you can balance out the center of gravity in the go kart for better handling characteristics. So the way the center of gravity is discovered or validated or measured is to put a scale underneath the rear wheels and a scale underneath the front wheels. Typically most people don’t have more than one scale so the easiest way to measure the center of gravity is to put a scale underneath the front wheels at one time and then the scale underneath the rear wheels. You compare the two weight and determine if you need at weight to the rear of the front of the go kart. As you may have noticed this weight measurement occurred after the go kart was made so this can be a distinct disadvantage especially to developing your own go kart. So the question comes how do we determine the center of gravity before we even make a go kart? The center of gravity calculation is achieved by summing up all the weights of all respective parts and their respective positions relative to the center of gravity. Then the front axle position can be determined if it is in the correct spot or not. We have blog section on the center of gravity and how to calculate it We also have a program that determines the center of gravity for you by entering all the positions and waits on the go kart that you’re designing. Be sure to take full advantage of these programs and articles if you’re developing your own go kart. Additionally we also have a spreadsheet that comes free when you join the Go Kart Guru newsletter. The Go Kart Guru newsletter comes out every week and gives you free information about how to build a go kart. Determining the Drive System CharacteristicsAs you probably may have guessed the weight to the go kart is closely related to the amount of power that is required to make a go kart perform properly. Since you’ve already figured out how much weight the go kart has using your center of gravity calculation, it only makes sense to start analyzing your drivetrain. The drivetrain can be summed up in the basically two different types of systems: – The simple centripetal clutch system You need to determine first which system you’re going to be using because the engine space will be dictated by how much room each systems can take up. For example the variable speed clutch system uses a jack shaft drive system which eats up a little bit more room than the simple centrifugal drive system. The actual calculation for the drive system is determined by Additionally we have on the webpage a go kart performance program which helps determine whether or not your go kart going to accelerate and how well it is going to accelerate. The basic rules of thumb, for example: the rear sprocket should be around 75 to 85% of the size of the rear wheel especially if you’re using centrifugal clutch system. Continuing the DesignNow that you figured out the center of gravity and the drive system you can go on ahead and start designing the rest of the go kart. Typically a go kart can be made out of .125 or 1/8 inch wall square tubing. I prefer square tubing because it is easier to put together a gokart frame especially when you’re trying to weld two tubes together. A round tube welded to another round tube especially at right angles can be quite a challenge and may require special grinding just to get the two tubes to make together.
As we discussed before there are various go kart designs such as the flat style the supported style and a full roll cage style frames. The flat style frame is the most prone to bending and therefore may require a thicker tube just so that the frame is not bending while it is being ridden over rough terrain. In the go kart building 301 course we discuss how to calculate stresses on your frame select a go kart does not bend in the middle. It is not just a simple as upping the wall of the tube, that may not be sufficient. Go Kart Steering NotesSteering system for the go kart is typically pretty straightforward. The front wheels are mounted onto a tube that is mounted on top of the framework. On a good go kart plan the steering system should be adjustable. The adjustments so that the front wheels can be moved forward or backwards on the frame. The reason for this is that there is a miscalculation on the center of gravity or the center of gravity needs to be adjusted without adding weight.
So as a side note, the steering system should be in under drive linkage, where the tie rod and is go underneath the persons legs. The type of steering mechanism should be in Ackerman system and the reasoning behind that is to maximize turning and minimize tire scrub and tire wear. There are other steering concepts that can be brought into play such as Camber and Caster and these are actually more danced design parameters that are more designed to make the steering more stable and actually give you more bite in a corner. We have a whole book that discusses camber Caster and Ackerman steering if you’re interested in maximizing your steering system. Seat Placement And Design
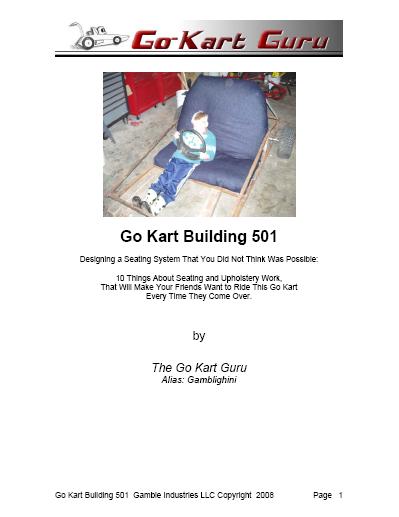
In the gokart building 501 book we discuss, for example, the optimum seat angle and the steering wheel position all based on personal preference. It really isn’t that difficult for all you have to do is sit aboard up against the wall and figure out you’re seat angle. Typically that seat angle can range from 10 to 15° or more. The seat is pretty basic design using plywood, foam cushioning, and imitation leather or fabric. The go kart seat is held in place to the go kart frame using wood and screws. Pedal PlacementThe placement of the pedals on the go kart is relative to the driver. The person space is related to where the pedals go on the go kart. When the gas pedal, for example, is fully depress in full throttle there should be enough room for the pedals move forward in the go kart frame. Also the actual movement of the pedals should not be flat to the floor for full throttle but more in a comfortable angle forward so that is not uncomfortable to drive one you are running the go kart. So a maximum angle of around 60° forward and full 90° up for idle. The range of motion is driver dependent and should be determined by the comfort zone of the individual. However one of the things to keep in mind is that the frame is long enough and takes into account the proper tire placement. As the frame is too short then the pedal placement may be cramped and make a go kart uncomfortable to ride. This may sound like nitpicking, however if you take the pedal placement into account before you fully develop the frame you be happy that you considered it. Additionally, the pedals should be adjustable so let a smaller driver can have his preference as well. The Brake System
Be sure to take into account what brake system you’re going to use. Additionally, your brake system is closely related to your axle system. If you have a live axel system then you are more than likely going to be using a disc brake. If you’re using a “one wheel wonder” system that has no live axle’s then you will be using a drum brake or a rubbing brake. The problem with the drum brake on a 1 wheel drive go kart is that only one wheel will be braking and that is not sufficient for good stopping power. So typically one wheel drive go karts have a rubbing brake system. A word of caution: do not make the assumption that a rubbing brake is simple and straightforward, it is not. There are extreme forces required to make a go kart stop and a rubbing brake needs to do administer large amounts of force into the tire without bending and becoming deformed. Additionally, the average person needs to be able to push on the brake without wrenching their leg apart trying to cause the go kart stop. Go Kart Bottom Skid PlatesTo keep the weight down and keep things simple the bottom of the go kart needs to be shielded so that stones and grass and so forth are not shooting up at the driver. Additionally it is extremely unsafe to not have the bottom of the go kart shielded from the ground. A foot can easily slip down into the exposed cavity and be torn off or broken severely. So do not cut corners and expect to have a go kart does not have a bottom skin. A bottom skin can be generated using sheet metal that can be found from local hardware stores. Do not use aluminum. Again do not use aluminum it is to not strong enough to handle the abuses of the go kart. To mount the skin there are various methods but the easiest method is to use self tapping screws which go through the skin and into the tubing of a framework. Use of that impact drill can get the job done in less than 10 minutes. A word of caution: make sure that all edges of the sheet metal are bent over so that there are no sharp edges. A simple fold on the edge of the skin will make a rounded edge so that there are no sharp edges. Again make sure there are no sharp edges on sheet metal because it acts like a razor blade. Frame FabricationWe are primarily talking here about fabricating a steel tube frame. A simple steel tube frame can be assembled using a flat garage floor. In the go kart plans that we have developed it shows how to use a simple fixture which uses wood. It shows you how to develop accurate layouts and the actual jigs that will keep the parts square and symmetrical. You can use this method to develop your own framework and jig it up so that the go kart frame is welded square.
You’d be amazed that there really aren’t that many clamps used, and that simple materials are all that is needed to develop this go kart frame. Keeping the go kart frame square on the floor is critical number one, and number two keeping the go kart frame square in the upright position is critical as well. When I say critical, I don’t really mean vital or absolute but what I do mean is that it’s helpful to have a go kart look reasonably square. You will not get a square go kart frame that is within plus or -.060 inch, however you will get a go kart frame that will look very decent and the casual onlooker will not be able to see that it is out of square. The main reason is that the go kart frame looks so fantastic to begin with. That’s not what most are looking for. Besides simple shimming can take care of out of squarness. The Go Kart Frame Provided on This Webpage:The go kart frame that has been developed and is being sold on this webpage has gone through over 200 hours worth of testing, finite element analysis, high speed testing, supercharger testing, rough terrain testing and a myriad of other little tests to determine its soundness.
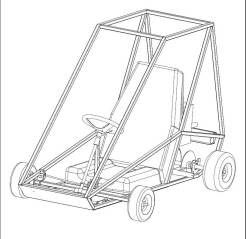
First of all you should have an understanding of why the go kart frame was designed way it was and secondly you should understand how to put together properly. The go kart building e-books give you all the information you need and then the go kart plans which are free are based as a suggestion for which direction you can go. One thing to keep in mind is that safety is of the utmost and the full roll cage version is highly recommended along with seat belts and proper driving safety equipment. The Phi Alpha 10 go kart plans take into account 50-50 weight distribution, full roll cage, uses a live axle system, is designed for a 5 to 10 hp engine, seats one person, has seat plans, sports a dual exhaust system, has the adjustable steering system built in, has the adjustable pedal system built in, has the Ackerman’s steering system built in, and uses a disc brake as standard equipment. The approximate weight of the go kart with an adult is approximately 300 pounds. There are over 100 pages of information given with the go kart plans which include fixturing, drive systems and prints for each part of the go kart. To get your extreme value, purchase the Go Kart Building Bundle, which includes the Go Kart Plans and a Superchargers Manual for free. If you want even more value, purchase the Go Kart Building Mega Bundle which throws in the Wood Go Kart Bundle as well. The Wood Go Kart bundle showing you how to build a wood go kart with an engine for really cheap, like under 50 bucks. |
 figuring out how much weight your go kart has and how much acceleration you want to have. Additionally, besides your motor will determine how well the go kart will accelerate and climb hills. This information can be gathered at the go kart performance program, or
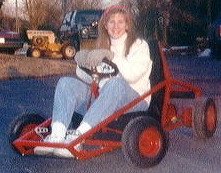
See The Go Kart In Action!
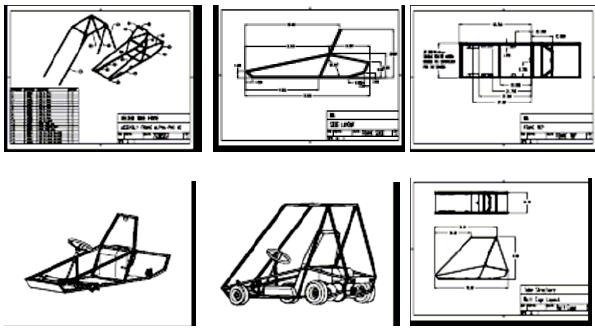
The last thing you want is to get a pile of prints that are hard to figure out.
Not so with these go kart plans.
The detail in the go kart print plans includes:
|
|
The Go Kart Plans are explained in the following excerpt from the Go Kart Video: |
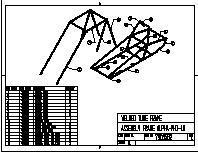
| You may not appreciate fixtures up front, so let me explain… To lay out the frame easily, weld it in one day and get on with the project requires some good fixturing.
Most weld shops would charge about $500-$1000 for the simple fixture that is shown in these plans. |
Below is a sampling of pages that you will get in the plans.

| Purchase Plans For $19.95 PURCHASE NOW |
The Super Charged Go Kart Manual
As A Bonus: A $15.00 Value
| Upgrade to the Go Kart Mega Bundle: Includes the Go Kart Plans, Superchargers Manual, and a bucket load of Ebooks on Go Kart Building for $29.95 (a $100 value) |
| Have you tried making a go kart and it was a flop?It looked like junk and fell apart?Did you wear out a go kart and now it it just pieces?Have you ever driven a gocart and it just went straight?Are you tired of hitting trees?These go kart plans will enable you to build a go kart that can corner like a Porsche, even in grass! |
you just can’t stop smiling when riding!
- You smile so much that bugs get in your teeth.
- The dual exhaust note, will make your engine purr and perform better than a standard exhaust system. The exhaust rapp during sudden acceleration is thrilling, and reminds you of a finely tuned race car.
- The comfortable seat, is acceptional in comfort and durability. Build a seat that looks like it was made by a leather expert, without busting you budget.
- You turn corners like a Porsche not like an overgrown lawn mower that just goes straight and plows into trees. The gocart corners like it is on rails! There is no out of control fishtailing with this gokart!
- You feel ultra safe, because the gocart is so stable. You feel protected by the unique side rails and roll bar design.
- Repairs on the go-kart are a dream. Changing the engine out in less than 10 minutes is a no-brainer. No Chain adjustment is necessary, a simple built in chain adjuster is compensates for chain slack and chain elongation.
- You spent less than $200 on the whole go-cart and you feel like a million bucks.
- When people come over, the first thing they want to see, is your fantastic go kart!
- Parties are not just parties anymore: they are gocart parties!
Get supercharged into making your own go-kart
…with proven winners!
What the Go Kart Guru is offering the wonder-cart of yesteryear!
A full set of 98+ pages of easy to read and understand
Alpha-Phi-10 gokart plans
The plans include:
- Incredibly simple Step by step Building Instructions
- Ingeniously constructed and low cost (less than $30) weld fixture designs
- Detailed prints on ALL parts, no guess work here!
 Adjustable Steering and Pedal System to accommodate differing height drivers.
- Hyper Comfortable Seat design, which includes patterns for cloth and wood backing.
- Ultra-Performance and Head-Turning Dual Exhaust System Design prints.
- Ultimate Automatic Chain Tensioner design prints.Remove the engine in minutes. Never worry about the chain coming off again!
- If you are not completely satisfied with the plans, the content or the design, you will get you money back, no questions asked!
| Purchase Plans for only $19.95! |
Free Super Chargers Manual With Plan Purchase!
supercharging a gokart engine. It is not just as simple as
bolting a supercharger, fog pump or turbo to your engine.
(which is not readily apparent)
to get the supercharger to boost the snot out of your engine!
complete with graphs and diagrams
gives you an edge into designing
your own radical supercharger system.
What a heart stopping thrill!
| Purchase The Go-Kart Plans For $19.95 And Get The SuperChargers Manual (a $15 Value) Absolutely Free! |
| Upgrade to the Go Kart Mega Bundle: Includes the Go Kart Plans, Superchargers Manual, and a bucket load of Ebooks on Go Kart Building all for $29.95! |