If you are thinking you can make a go cart in a week you may be sorely disappointed that there is a lot of planning and part procurement required to actually get a go cart put together in a week.
Realistically a go cart can be put together in a month depending on how many of the weekdays you use up in building a go cart. Building a go cart can be lumped open to nine different steps
- Making the frame
- Making the drive system
- Making the steering system
- Making me brake system
- Making the throttle system
- Making the seat
- Testing the go cart
- Tweaking or minor changes
- Painting the frame
Break up the go cart building exercise into seven weekends. The schedule should be similar to the following:
Weekend one: build go kart frame
Weekend two: the rear axle, drive system, and engine
Weekend three: steering system
Weekend four: brake system
Weekend five: seat and throttle system
Weekend six: bottom skin, on off switch, muffler
Weekend seven: paint frame and reassemble
It should be understood at the outset that making a go cart in one weekend is a very difficult thing to do especially the metal frame go cart.
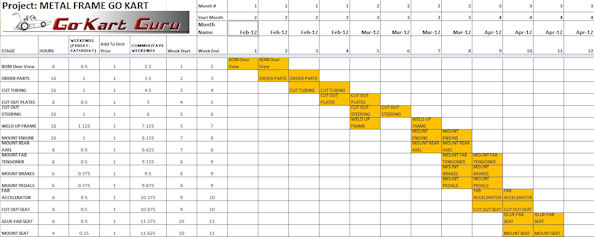
Download the realistic Go Kart Schedule Calendar. It is all ready for you to use now. In the month bar put the month you intend on starting.
For example, for February put the number 2 in the “Start Month” box (upper right next to the Logo). The Calendar will calculate based on weekends the timeline for your gokart project.
Download the Realistic Go Kart Schedule Now!
The First Week
The object of making a go cart really is about developing skills, ordering your processes, and working efficiently. One of the best things you can teach your child or your son or daughter is the ordering principles around making a go cart. You need to order parts and get material together. You need to know exactly what the steps are going to be in order to get things done in a weekend.
Before you even start putting a go cart together, assess what you need. We all know that what you need is some metal obviously. We’ll need to figure out where to get our metal tubing, our miscellaneous go cart parts such as tires and wheels and engines. (go to https://gokartguru.com//go-kart-part-sources/) Other small parts such as Rod ends, steering wheels, shafts, nuts and bolts and so forth, need to be put together before they go cart is actually fabricated.
To make things simple in the first week prior to the weekend, I like to get the tubing in order. I have a special place across town that I actually can buy tubing from and they will ship to you, if you need it ship ped to your house. I like to get the tubing put together and assess what I actually need for the go cart frame.
Also make sure you, obviously are following some sort of plan, or you will be running in circles and redoing a lot of stuff. A plan is a time saver from a whole bunch of levels.
The Weekend Number One
Then on the first weekend, Friday night, I saw all the tubing parts to the correct length and angle.
Then on Saturday I worked on making the fixture and then place all the tubing into the fixture and tack weld the frame together. Then by about noon I should be able to fully welded frame together. It takes about three hours to weld the frame correctly. By the end of the day you should be able to mount the rear axle onto the frame using the axle bracket plates.
Weekend Number Two
On the second weekend, a lot of detail needs to be put into mounting the engine and a reardrive axle. What needs to be bought at this time is the clutch system, the chain, the sprockets, the chain tensioner, the motor plate, and the engine.
I like to reserve a whole weekend for mounting the drive system together because to rush this step you’ll have a lot of headaches later. Allowing yourself more time for the drive system (which entails mounting the wheels, mounting the rear bearings, mounting the reardrive sprocket, mounting the engine, and mounting the chain tensioner system) gives you the time needed to not rush this step and to devote the time needed to set the pieces in the correct positions and get the correct drive ratios.
A critical step here is that you understand the drive layout and the ratios so that you don’t have to read work the whole system again at the very end when you’re trying to test the go cart. You should have a good idea what’s going to happen with the drive system. Quite honestly 90% of the work is the pre-work or the assessing of what the go cart is actually going to do.
On our go cart webpage, we have the engineering toolkit which is a free program that shows you how to figure out what the engine is going to do for a specific ratio that you are specifying for your go cart design. So in reality this second week is devoted in the week prior to the weekend to doing calculations drive system, procuring parts such as clutches and chains and sprockets, so that you are not spending your whole weekend deciding whether or not the system is going to work or not.
So plan on your second weekend has been the application of the drive system to the go cart.
Note: If you have a vertical drive system count on actually adding another weekend to your schedule. The vertical engine drive does take some thought and I would suggest that you use the vertical engine course that we have on our Web products page. The specific e-book that applies to the vertical engine drive is Go Cart Building 202.
Weekend three: steering system
The steering system can be a little tricky especially if you are ever getting everything from scratch. However if you are purchasing the steering components it can shave off a couple of hours of fabrication time. I would strongly suggest that you buy prebuilt steering components. Plan on taking a whole weekend to design and build the steering system. Remember placement of the steering system is vital for 50-50 weight distribution.
Make sure you have studied the weights, and the steering positioning for optimum comfort and performance. This is a step that you do not want to rush through so if it takes more than a weekend to do it; take more than a weekend to do it.
Weekend four: brake system
The brake system, and the throttle system can be put together in the weekend number four. I however like to devote a whole weekend to putting the brake system together. What is entailed here is that you’re actually placing the peddles and the linkage for the brake system into the framework. Depending on your brake system whether or not it’s a drama system or a caliper disk system, will dictate how the brake system is mounted to your framework.
Most of the work on a brake system is actually mounting the rear caliper brake system and the associated linkages between the brake system and a brake pedal. Figuring out the spring return system is a large part of the battle. Again make sure that you take a weekend and not rush through mounting the brake system.
If you have enough time you can start figuring out the throttle system but you may find that there just isn’t enough time left to mount the throttle. It will have to be left for the next weekend.
Weekend five: seat and throttle system
During the fifth week I would start buying cloth (or vinyl ) and cushions for the seat. Also wouldn’t be a bad idea to get some plywood and start laying out the seat parts into the 4 x 8 sheet that you have purchased come Friday night I would start cutting all the pieces for the seat and glowing them together. Come Friday morning you can tack all the vinyl onto the seat. The next step would be to mount the seat into the frame.
By about 10 o’clock or knew you should have the seat mounted into the frame. At this time you can start thinking about the cable routing for the throttle. The the throttle pedal system can then be routed into the framework and around to the engine. It is a good idea to have this step started at least before noon. The reason for this is that you probably can I have to run off to the artwork store to buy some cabling or springs.
Again don’t rush through the throttle stop. I like personally to have a universal throttle system which is spelled out in our 302 book, on breaks and throttles, and shows you how to set up a universal throttle system so that you can mount various engines onto your go cart without having to worry about re-doing your throttle system.
At this point in time you’ll be very tempted to run your go cart. I would strongly suggest not to ride your go cart yet. The reason for this is at the bottom scan is not on the go cart and you can be severely injured when the bottom scan is not there to protect your feet from the ground. So it’s going to have to wait until the next weekend when we are mounting the bottom scan to the go kart frame.
Weekend six: bottom skin, on off switch, muffler
The bottom skin mounted to the go cart frame should not take more than three hours to do. However there is a lot of finagling required with sheet metal and self tapping screws. Care must be taken to make sure the sharp edges are folded under so that a casual brush against the go cart does not cause a severe cut.
Other parts can be mounted onto the go cart frame it this time, the on-off switch and the muffler system. This will take up the rest of the weekend.
The actual fabrication of the muffler may take three or four hours, and mounting it on to the frame and making sure that the mounts are sound may actually take more than just a weekend. I like to devote a whole weekend to making a good muffler system. So when I tend to do is leave the muffler alone until an exit proved out the go cart and then I view the muffler is like frosting on the cake. I like to take my time and do it the job on the fabrication of the muffler system.
Remember this is a dual exhaust muffler actually has an aesthetic value to it so make sure that you spend some quality time on fabricating the muffler.
This will be the weekend of the test. So it will be very tough to not take a ride on it. But remember to look out as usual, for things that might break. Watch for cracks, watch for bending parts, do not take the go cart up to full throttle, until all parts have been inspected and tightened.
Weekend seven: paint frame and reassemble
This is the cake weekend. This is the weekend where you can enjoy the go cart, enjoy the design, and just plain admire what you put together. This is also a sad time, because you’ll have to be taking the go cart apart. Every part will need to be cleaned that is going to be painted. The painting of the go cart takes actually only about one hour. But the whole process of setting up a go cart frame setting up all parts takes a whole day. So in the morning to what would you will do is start taking the go cart apart.
All parts will need to be laid out, that need to be painted, and the frame only be hung up so that it can be painted from all angles. The frame should be primed then painted. What I do is on Friday night take the go cart completely apart. Then prime the frame just before bed. Then the next morning a fresh coat of paint can be applied to the frame. Wait a couple of hours, and then repaint the frame. The best thing you can do is put out a son so that the paint can bake onto the frame quicker.
Unfortunately, you probably will not be able to put the go cart together until midweek. The actual assembly of the go kart takes about three or four hours depending on how well you know the go cart. So what will probably is better round Wednesday the go cart will be put back together and reassembled.
Conclusion
So a lot of the short of all this, is that it takes about seven weeks to put together a go cart from scratch. Make sure that you have this in mind when you are starting a go cart project. Again a go cart is a fun, and educational project, however, it does require thinking, preparation, and patience.
So when you start thinking about a go cart, the best thing to do is start thinking about in a winter and then by the summer you’ll have all your parts together and you should be a little start your seven-week process and get the go cart running over the summer.