The Development Files chronicle the go kart as it came to existence in my life. It has been a memorable and exciting experience that I think you will find very interesting. So hold onto your seats…
Quick Jump Links
Back in 1891….just kidding back in 1974 I saw my first belt drive go kart. I remember people standing around it and admiring it. It must have been a Fourth of July weekend because there were streamers and so forth on it. What I remember most though is that it was a belt drive using a standard type lawnmower engine. I could see the belting and the engine layout, but for the life of me I couldn’t figure out how it was actually “geared up.”
I never got closer than about 15 feet from it, so I really never got a close look at the go kart, so as far as I am concerned it was a gas motor with a “black box” that drove the rear wheels.
That is how most of us feel when we see a go kart for our first time: “Boy that was cool, but…how did it work? Quite awsome…but don’t ,make me build one!”
As far as building my own gokart I never seriously tried, but instead, I kept my hands on bicycles, took bike mechanics courses and even fixed peoples bikes, but never dabbled with go-karts for a long time, almost 6 years past before I really gave it my first try.
| Go Karts an Obsession or a Neglection?
There are two mistakes a parent can make in the life of their child and that is:
The first mistake of “giving them what they want” makes them not really desire anything, which can be detrimental. The creative forces to go beyond themselves is rarely found in kids who are given everything. I saw kids who had go karts and they could take them or leave them. That is why I got such good deals on them. The kids usually just wanted to get rid of them. The second mistake is that you just “don’t give them everything they want. ” For the most part, when I was growing up, we could not afford the things I wanted, like a go kart, so I had to just dream about them, or do something about it. When the Sears catalog would come in I would go right to the go-karts section and price them out. $500 was just too much money, and as I would find out later, the go karts were not even that great. You may say, why is “Don’t Give them what they want” a mistake? It is mistake because, where you don’t give your kids something, and they really want it, that may be the area that they really directs a lot, I mean a lot of their energies. This ‘misallotment of energies’ can be a blessing or a nightmare for a parent. My mom thought go karts were a blight, but as it turned out, go karts were a blessing.
In my case the go kart was always just out of reach. The go kart continued to be out of reach, even when I had a go kart, because the “ultimate go kart” just never came to be. And dare I say, there is still that go kart I want to build….. Lest you think I was totally one sided and only thought about go karts, that is just the Ice Burg that you see on the surface. There is much more. Go karts were not the only things I was passionate about. During the times when go karts did not exists, I was passionate about: tree houses, bikes, army guys and steam engines. I would say my passion for steam engines almost exceeded the go kart, because the plan for the first Steam Engine that would drive a Go Kart was already on paper before official plans for a gokart were underway. In the midst of the go kart drama was a myriad of different style toys with mechanism that all had their effect on the gokarts as they immerged. I would say that go karts we like advanced math, and the other toys basic arithmetic. (A web page will be coming soon that has all the fun toys I developed out of Legos, wood etc… when I was kid.) What you will see in my childhood is an Entrepreneur, an Engineer, and a Philosopher all in the making….but I digress…. |
The First Go Kart
We were at my grandpas one summer, and I only had a couple of days to play around, so I decided I was going to make a gokart. My grandpa gave me two lawnmowers off I went.
The overall design was a three wheeler, like a big wheel. In the front I was taking a bicycle steering system and the back was the handle bars with a welded on skin from a barrel top. I was going to mount the engine on its side so that the shaft stuck out to the side. I was then going to take a pulley and mount it on the output shaft of the engine. The general idea was to drive the rear wheels (which were push lawnmower wheels) with a belt.
That was the plan anyway. I had two days, and by golly I was going to make this go kart. I had visions of flying through the corn fields….!
Okay, back to earth..
I managed to get the frame made up pretty quickly, I think that was the first day. Then I took some tubing like conduit and smashed the ends so that they were flat. I had drilled holes in the smashed ends so that I could attach one end to the motor and the other to the cart. Everything was going like clock work. Frame, engine mounts, now to get the engine to run.
My grandpa must have suggested using the two cycle motor, because it was simple and light weight. We had a logistical problem though and that was going to be getting that engine to run on its side. So for the next day I worked on a wooden manifold to mount the carburetor too. Needless to say, it fell apart. I was trying to make a sophisticated mount, where the carburetor was twisted 90 degrees using wood! Not a good idea.
Well, the vacation had come and gone, and it was time to bring the go kart home. I tried working on the front steering and used nails for pivot pins in the steering. I was using rivets to hold things together it was turning into a “strength of materials nightmare.” The go-kart sat for about another year, until I resurrected the idea anyway, of a gokart from the ruins of disaster.
Go Kart Number 2
I decided to not try playing with the carburetor mounting but to use the engine as intended, vertical. So I first made this go kart using wood and two by fours. I even made a print, and I wanted to scan it, but it was too large for my scanner, so I will describe it to you.
It was a basic two by four constructed rear section with a single two by four mount for the front wheels. The engine was mounted vertically on a plywood covered steel sheeted base. The exhaust pointed down into the ground. That was the first engine I go running on my own. We even started a fire in the process. Some how gasoline spilled near the spark plug and the engine was pulled. Needless to say a spark shot and started a fire. That was the first and last time I used a fire exstinguisher. I was 14 years old.
The motor, though ran beautifully, but that was it. It ran, but was connected to nothing. The biggest conundrum to the whole process was getting a pulley that fit on the end of a 7/8ths inch shaft. Nobody sold one. I was getting really frustrated. You couldn’t even get a centrifugal clutch to fit a 7/8ths shaft. How was I ever going to make my go kart out of nothing when I could not find what I needed!??
Well, I was not going to let that detour me, so I made an elaborate body, for the go kart. It looked pretty neat (sorry no pictures…), but it was really heavy. I took our 16 hp Sears tractor out and pulled it down the street to see how well it would ride. It was interesting to say the least. Because I was using wheel intended for a lightweight 20 pound push mower, they fell apart, even though they were made of steel and rubber. The rubber came right off the rims, all four tires!
By the time I got down the block, all four tires were off the rims and I had to “drag” the go kart home! My dad said, “Get rid of it, it is too heavy” so we wrecked it. (I know we got pictures of it, perhaps one day we will get them on the site…)
| Interlude: The Paint Can Go Kart!
The what? That’s right the paint can go kart. My friend Willy came over one day and we decided to go out to the house that they were building down the street and rummage through the “to be burned pile.” There were all sorts of goodies: nails, boards and paint cans. I don’t know what came over me, but I thought we could make a go kart out of all this stuff. So we busily started constructing the basic two by four go kart layout. Then it came down to wheels. What do we do for wheels? So I took four nails and pounded them into the center of a paint can directly into the two by four axil post. I put four paint cans on the go kart and walla! Instant paint can go kart. We got it out to the street and Willy sat on it and I started pulling, and pulling and pulling. We got that thing going about 10 miles per hour when all of a sudden the painted cans started coming off one by one. By the time we got to our house we had two front paint cans and no back paint cans! The centers had wallowed out so much that the paint cans fell off, other than they worked beautifully. Willy said that was the funnest and funniest day of his life. I would concur, I can hardly stop laughing about it every time I tell the story! |
Go Kart Number 3
 Go kart number 3 was again a wood go kart. The basic layout but this time we started robbing motors off of things. First it was the roto tiller. That sort of worked. Then it was the wood chipper, that sort of worked too. But the down side was having to put the motors back on the original equipment, so we had the go karts running for hours versus days.
Go Kart Number 4
By this time I had access to a friend who had engine parts and other odds and ends. He brought over this airplane cowling and we were going to fit it to the top of the go kart to be an engine scoop. It was going to be some go kart! At least looking anyway.
I took the 4 cycle Techumseh lawnmower that my grandpa gave me and mounted it sideways. I additionally had the head milled by my friend so that it had arm wrenching compression. By this time I had found a pulley for the engine. Inside the engine I put a dipper on the connecting rod so the engine could run and be lubricated still. (The oil pump is mounted off the camshaft and sits in the oil. Mounting the engine sideways brings the oil pump out of the oil, so adding a splash lubrication system substituted for this.)
The engine ran great until I tried to engage it. The rod blew. To this day I am not sure why the rod blew. The engine itself must have had too high of compression. I am not sure, but the rod blew to smithereens. The bolts were tight, the lubrication hole was in the right spot (there was no sign of seizing or galling), it just did not like engaging the belt drive and broke instantly. Talk about a bummer.
Well not to worry, I had the old trusty two cycle engine from grandpa. It still ran, but I needed a carburetor. So I went out and bought a diaphragm carburetor for $40 and got the engine to run sideways.
 We did not have wheels at first so I made wooden wheels out of plywood using a Skil Jig Saw. I used a pencil mounted into a board that I drilled a hole in and then pounded a nail in the other end. I would pivot around the nail and draw the circle into the wood. I cut it out and ,Walla, instant wheel. To make the belt track I made a smaller wheel and then nailed the wheel boards together. The down side to the wheel being a pulley is that the wood does not track into a V pattern like a pulley so the belt eventually started to slip and then did not work at all. But for the first couple of days it worked great.
 The ratioing of the engine to the wheels was always an unknown to me, or guess work to me. Not until years later when I developed the computer program could I make the ideal pulley ratios that would work well.
I did however come up with an arrangement that worked okay. I used a stepped pulley or jack shaft arrangement. I took the small end of the pulley and belted it directly to the rear wheel. Then I took the larger part of the pulley and attached it to the motor. To get the motor to engage, I used a rope and pulled real hard on a tensioner pulley.
I never did improve the pulley mechanism, because shortly thereafter, a friend came over and offered to sell me his go kart for $45. We were entering the jet age now. No more wooden wheels, a real honest to goodness go kart!
A New Era..The Age of the Real Go Kart: Go Kart #5
One of my friends had a huge get together at their house during the summer of 1984. I happened to be sharing my experiences about the wood go kart when he said “Hey I have something to show you!” And wouldn’t you know it, he had a go kart hidden away under a tarp in his back yard. For whatever reason, he said it was going to take more trouble than it was worth to get it going so I could have it for $45. Wow, $45 I thought! No problem, I will be over early tomorrow morning.
So we got out the trusty rusty suburban and picked up the go kart! It was like flying when I brought that go kart home. I could not contain myself. I worked all day on the gokart. Got the chain in working order. Disassembled the engine a bit and then put it back together. I did not have any cabling for the throttle so I used a piece of fishing line, and rigged it to the foot pedal. I did not even have foot pedals either, I had to used bike pedals and my trusty old tubing compression parts.
By 11:30 at night I got the engine running. The exhaust was shooting out nice loud blue flame! My mother came out and side “For goodness sakes you are going to wake up the neighborhood, shut that thing off!”
So we had to wait the next day and test it out! I do not think I slept any that night. How could I? Any way, one of the memorable events was my brother test driving the gokart. When he got in he must have floored it right away, because it took off straight into the front yard, and whammm!… Into the ditch!
It was pretty quick. And did I say loud!? Yeah, using a soup can for a muffler just does not cut it. The most poignant memory is getting my arm burned on the tin can after a adrenaline rushing ride. I still have the burn ring on my arm.
We must have bought that go kart late in the year, because I remember riding the go kart on a cold cold Fall day (it was starting to snow) and I was freezing my face off. But that was only the half of it.
I ripped down the road and around the neighborhood and then blew the rod on the way down a hill. I had to have someone drive me home, because I was so far away.
The engine was weak to start with so I wasn’t surprised. I had pushed that engine hard, by running it with my Wesson oil mixture and also by using the milled head off of the lawnmower engine that my grandpa gave me.
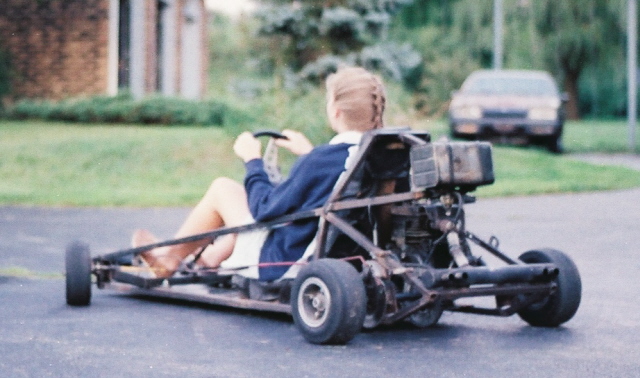
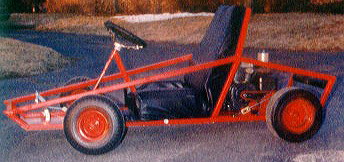
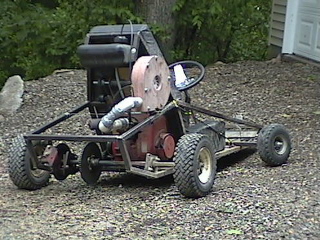
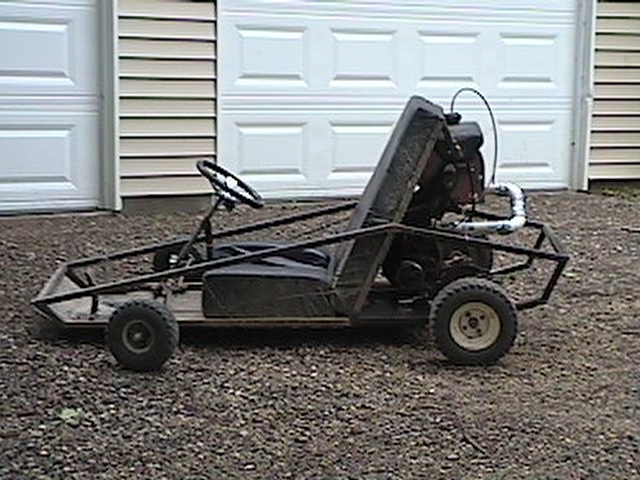
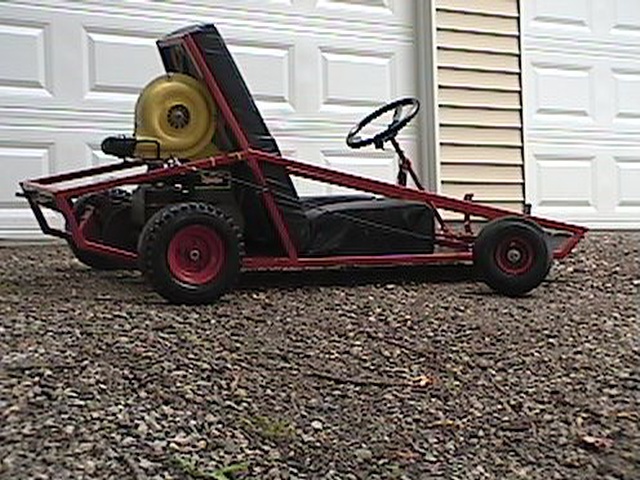
I never did get any pictures of the original go kart but I did get pictures of the go kart after I did my first round of modifications.
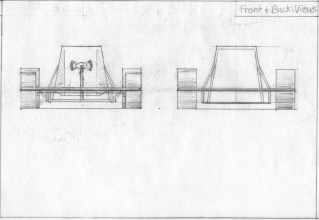
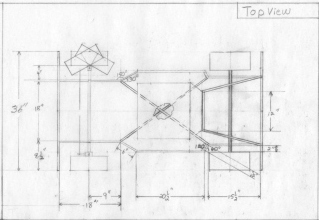
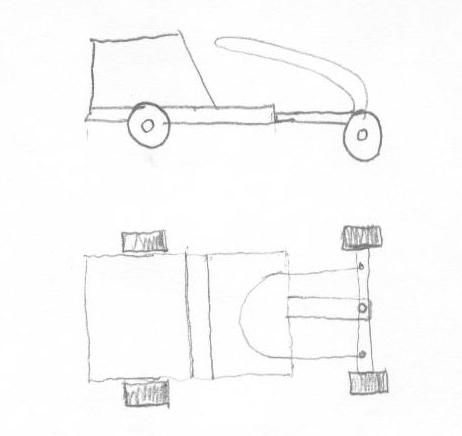
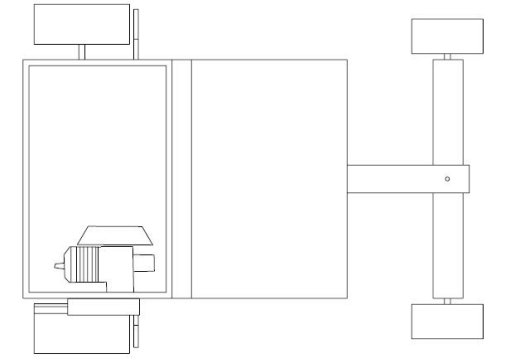
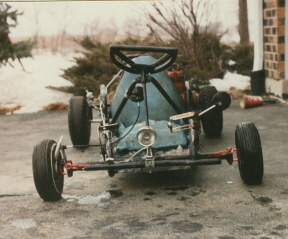
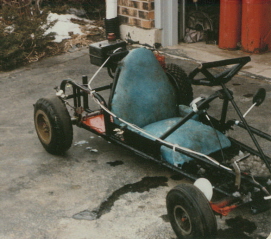
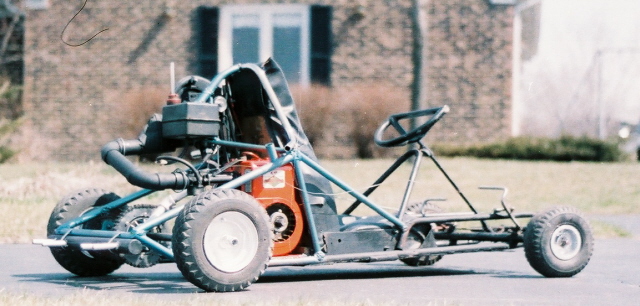
The modifications started out with an idea. The idea was to have an independent suspension. I did not like a couple of things so I was pushing hard for modifications. The axils were bent, the motor mounts were in rough shape and I wanted to dabble with more ride comfort. So I made the following print to plan out the changes:
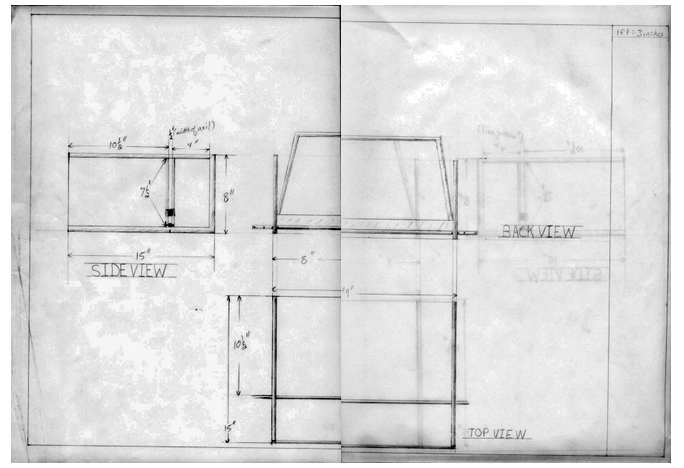
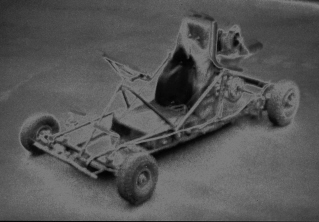
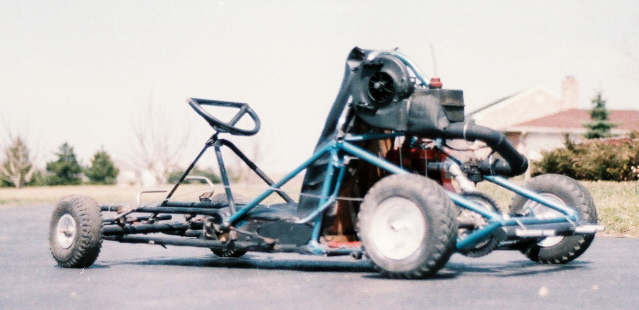
The print shown is a floating axel system, similar to what you see on ultra lights aircraft. I followed through with the plan and incorporated it into the following go kart, which really is the original modified. Notice the bike parts: bike pedal for a brake pedal, bike mirror, bike generator set, and even a bike speedometer. I worked through the ratios and determined how many wheel spins were required for each speedometer spin.
 |
 |
 |
 |
Notice the snow, and the snow on the floor and seat of the gokart. I had been out doing major donuts into snow drifts and stuff. That was quite a spin I had that day! (Everything done in safety and caution of course!)
If you look closely to the third picture on the right you will see a slot that the axel road in. If you look closer you will see a bungee cord that is holding the axel in place. I used a stainless steel axel that I got from a local manufacturing plant.
As you can see as well, the muffler on the engine is bent over. I flipped the go-kart one wild summer afternoon and broke off the spark plug and bent the muffler. And yes I did get hurt. And yes I was only wearing shorts and yes, I did get road rash and yes my mother never found out about it, and yes it was dumb.
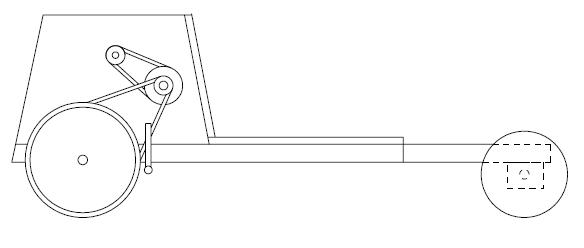
An innovation that carried over to the go-carts that I design today is the roller skate wheel. What occurred here is that I ran out of engine adjustment room, and as you can see, I invested a lot of effort into putting in a suspension system so moving the axel shaft was not going to happen without a lot of down time. Additionally, the axel shaft because it was aloud to float up and down, caused the chain to become slack when the wheel went up.
The requirement was a tensioner. The roller skate wheel worked great then and still works today.
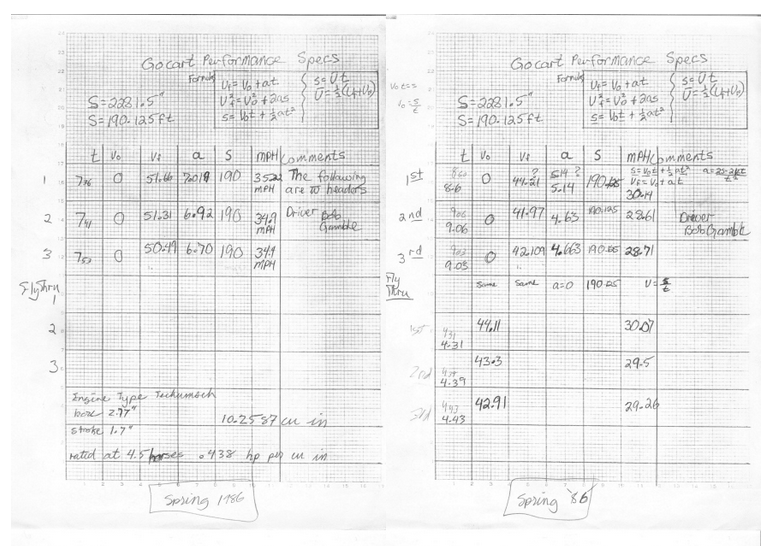
This go kart as well, had a high compression head. I modified it later and put on a high flow muffler and a straight shot intake. I took time trials of the gokart on the following chart times:
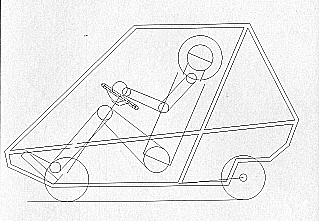
This was now the beginning of the age of pre engineering. I started to write computer programs and document things more. The following drawing reflects the tenor of how well go-karting was progressing:
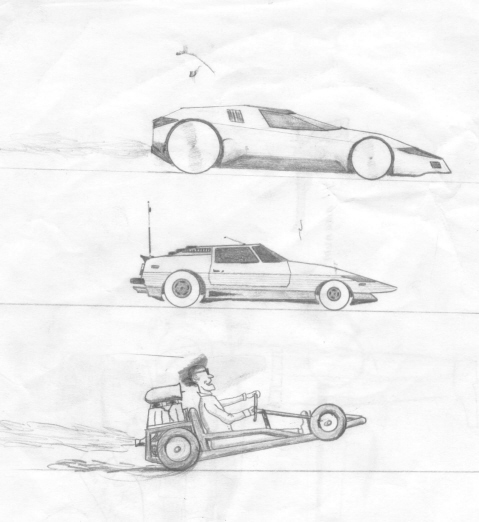 The drawing started out as a car on the top. Then my friend drew his car in the middle. Then I drew the go-kart, and then he drew the guy. The road warrior type intake was typical of that time! You can also see the resemblance of the gocart frame to the frame that existed at that time too.
Go Kart #6: The Turbo Go Kart
Go kart #5 ceased to exist when the chain started slipping. Everything was wearing out. the drive sprocket was worn out and allowed the chain to slip. Additionally, the brakes were wearing the tires out. The gokart also had its performance flaws, namely the gokart was too narrow., The flip convinced me of that. A wider solid axel and disc brake system were the better option for better stability and braking performance.. I basically removed all of the rear end accept the motor plate.
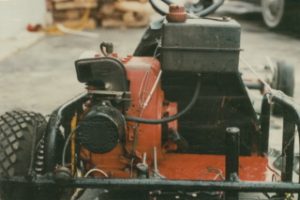
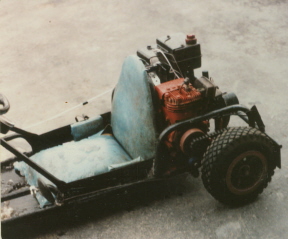
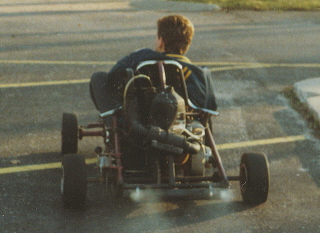
I took apart an old bike and used the handle bars as a roll cage, the tubing for the back end , and used some cast iron tubes as side supports. The additions to this go kart were, new gas and brake pedals, cushioned seat, a solid axel, disc brakes, roller bearings, and a supercharger that could be turned on and off with a hand lever (shown next to the seat). I also was tired of a loud muffler, so I developed my own quad muffler system. It worked really well and kept the sound down and allowed decent performance. After about 3 days of modifications the following go kart immerged.
 The go-kart shown used the same Tecumseh motor that was used on Go Kart #5. This particular go-kart was a little heavier than the predecessor but it was geared higher, so it got up around probably 38 mph. The insufficiently supported straight shot intake took its toll on the manifold mounts on the block and tore out the threads. I tried a different modification plate, but the logistics of it all were getting too difficult and leakage was still occurring. It was getting harder and harder to start, because of vacuum leaks. So I switched motors out to the Briggs.
Prior to running the Briggs I had another Tecumseh block that a friend gave me, that I tried stepping the turbo up to a 4:1 ratio. The blower was bogging the engine down and then all of a sudden the engine blew the rod. After dismantling the engine I discovered a solemn truth about Tecumseh’s: the rod bolts are finicky and require either wiring or thread locking compound.
I was impressed with the Briggs engines rod in that the bolts were held in place with a flange plate that was bent over around the rod bolt heads. You could run the engine at full throttle all day long and never throw a rod! The following go-kart immerged with new blue paint job:
The Briggs was a little frustrating, in that the pull string housing was defective. (I in my impatience from years before, had cut off the pull start rewinder.) We had to start it with a drill, or used the pull string system separate and then daintily took it off while the engine was running. This was not a nice set up that way. Also, you had to sit on the pull string and pulley, in case the engine died.

I was offered to buy the yellow go-cart and its sister for $100. I promptly bought both and sold one for $100 to my friend. The sister cart was the Mustang of go-karts, it was very light and quick, however unstable and apt to flip. (picture not available yet)
I also fixed a real racing go kart and had it over at our house fixing it. I had this go kart party where everyone came over and was buzzing around on something. Either a go kart or a minibike, or even a motorcycle! It was dissappointing to have the gokart of gokarts just sitting and waiting to be put together.
I had just painted the gokart during the week and had not anticipated that there would be this party. So during the party we put it back together and got it running.
I zipped out and caught up with the other gokarts, when all of a sudden as I was passing the racing gokart that was parked on the side of the road, the driver decided to NOT look prior to turning out and he turned into my path and smashed my rear right tire on his front left tire!
It sent me spinning and tore the axel right off the supports! I doing about 4 spins and then ended up in the ditch with the engine roaring. Thankfully I was okay, and no-one was hurt. The other go-cart was not even damaged at all. I was impressed with the strength of the Chrome Moly.
Gokart # 7 Turbo Dual Intercooled Go kart
Because of the accident, I needed a new axel. The other driver, my friend, (yes he was still my friend), paid for a new axel. I bought through the mail, a shaft, axel, tires and rims.
I decided to up he performance of the blower system. In tests prior it was shown that the gocart actually would not go to full rpm, and would be passed up by slower go-karts. We figured out that the blower or supercharger was generating too much heat, and that the heat had to be removed somehow.
I developed a water chilled intercooler, a water cooled intake manifold, and a higher free flowing exhaust. We put aside the old muffler, and started over, with a higher free flowing exhaust, bigger tube, and bigger exhaust outlets.
Additionally, I developed a choke activator mechanism, which used the governor to turn off the choke. We were using a larger, 12 hp briggs carburetor on the engine, and it always would quit at low rpms. You had a dickens of a time getting it up to speed, or it would quit all the time. So I remedied it with so that the choke was “on” at low rpms. When you stepped on the gas, the engine would get a rich fuel mixture it needed for good low rpm torque, then it would open up (because the governor pushed against the mechanism) when the rpms kicked in.
 |
 |
 |
 |
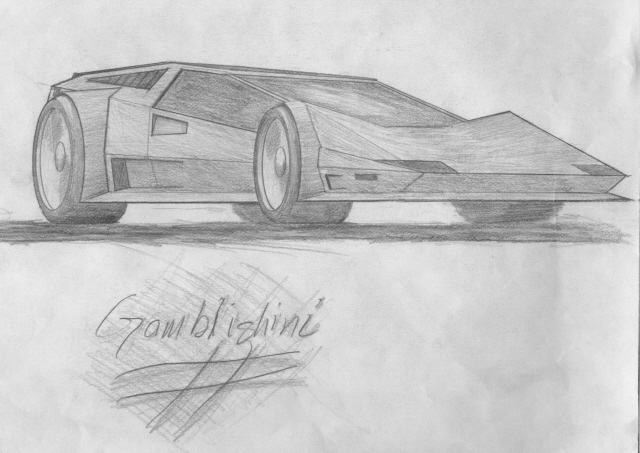
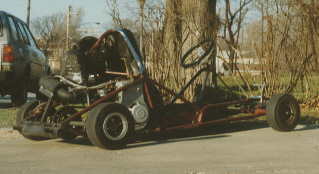
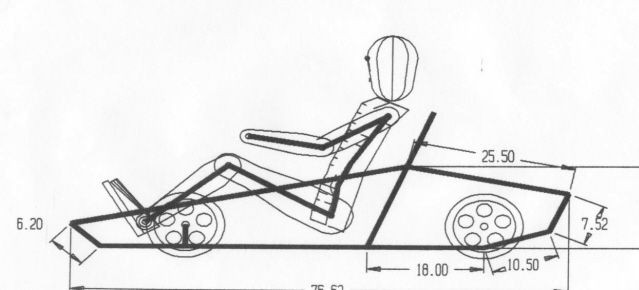
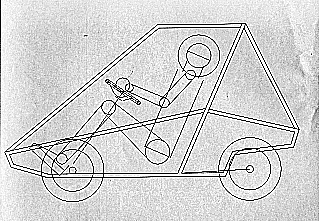
This go-kart probably was the most amusing, funnest and most exhilarating go karts to drive, in that it vibrated, it whined and it was quick. To commemorate its memory I made a print of the Turbo, Dual Intercooled Go Kart dubbing it Gamblighini Turbo GTS Gocart.
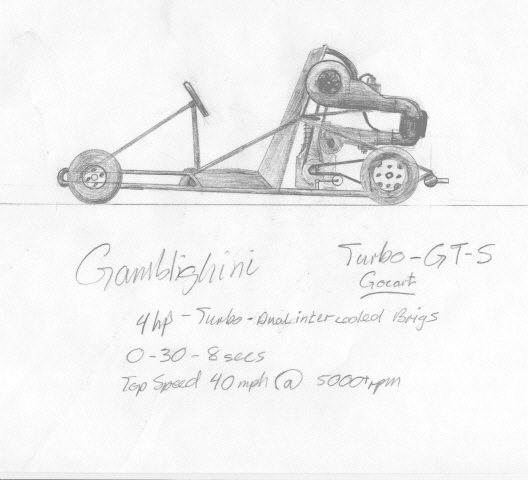
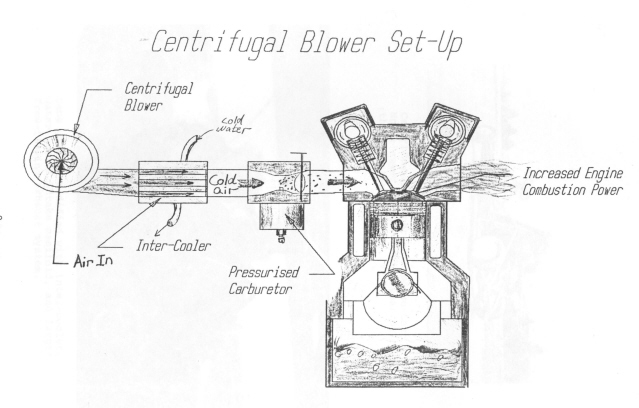
Several papers were written about the supercharger system, and the following demonstration drawing was generated:
The Turbo GTS was a primarily a research and development project and was used for testing the following different combinations of:
- Supercharging
- Intercooling
- High flow intake systems
- Engine modifications (ie high compression heads)
- High flow exhaust systems
- Fuel Types (ie Wesson Oil, Model Airplane Fuel etc.)
- Engine Types (Tecumseh vs Briggs)
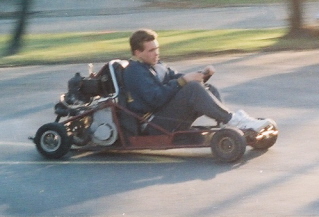
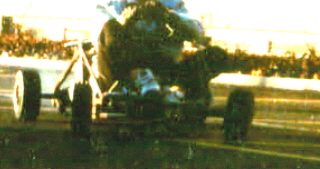 The go-kart was basically an engine package, and not a performance package, so the days of the Turbo GTS were numbered. When you pressed the go-kart into a turn it would just go straight, and this was just not fun. A go kart should turn on a dime, not crash into a tree. The picture shows the front tire “bending over” in a hard turn, the problem that plagued the Turbo GTS.
Things had to be changed, and the search for a new, more advanced design was needed, so the Turbo GTS was scrapped and the PHI ALPHA 8 immerged.
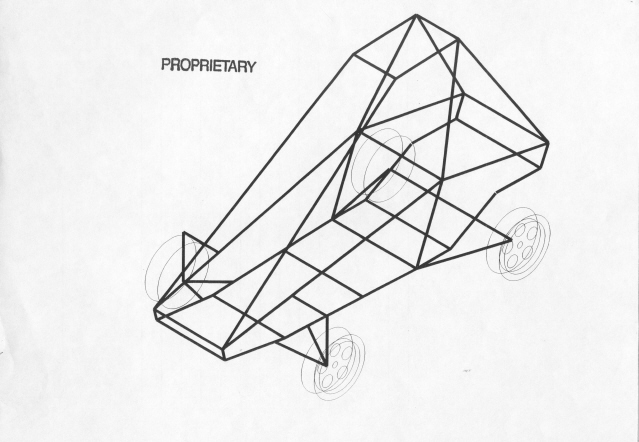
Frame DevelopmentAs go kart testing progressed, the strengths and weakness of the test cart were being discovered. In the beginning the computer was being used to access Horsepower and Weight performance, along with gearing ratios. With this information the ideal go kart was being thought of and sketched. The very first go kart design (based on the gokart data that was being collected) was the following print: The basic idea for the print was based on strength, not aethetics (or looks). This print was concept, and had yet to be proven out with center of gravity calculations. 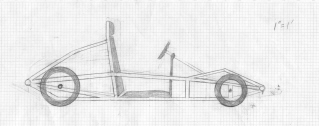 The “yellow gokart” so impressed us with its cornering ability and its look that I made this print. This particular go kart retains the rear section of the Gamblighini Turbo GTS, and has a new innovation, and adjustable angle seat. 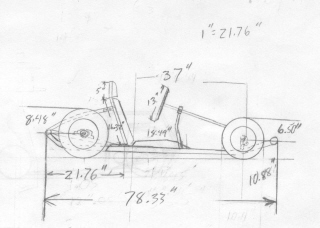 The computer was used to calculate primarily what Horsepower would do for a gokart. The spreadsheet included in this website uses this programs formulas. The go kart shown is another concept cart as well. As you will find out, there were a few concept carts, and not one design was settled on. At first glance however, this go kart probably would not have corned real well, being very back end heavy. 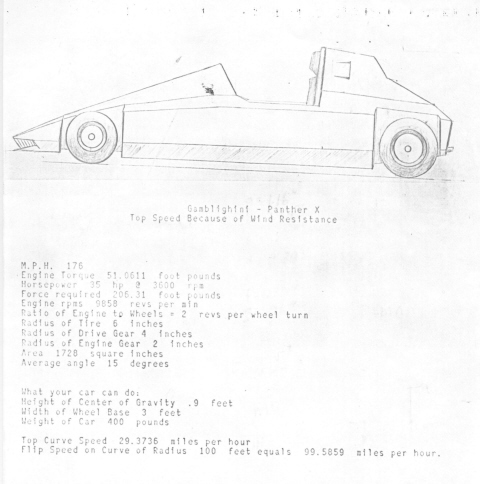 After more serious evaluation of seat placement, stearing wheel placement, engine placement and frame strength, the following frame was designed. 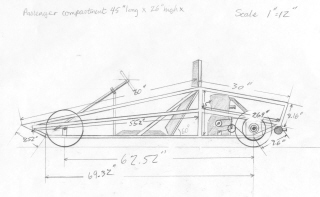 After driving the gokart and seeing the lack of cornering performance, it was decided that a change in the wieght distribution on the wheels was required to get the front wheels to grab and turn the cart well. The following go kart has a longer stance and more weight put over the front wheels. 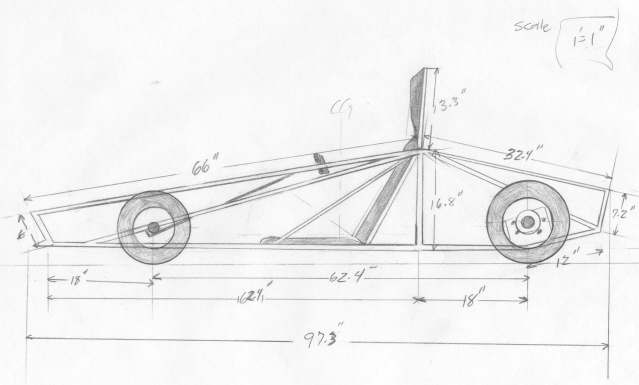 The Phi Alpha 8 used the basic concepts of weight distribution to be used on this frame design. The major problem that was to be found out, was that the go kart was not comfortable. It was too long, and in order to actually drive this gokart you had to lie down in it, making it not really desirable, especially when driving on pavement with bumps and so forth. |
Go Kart #8 Phi Alpha 8
Because of the enduring design aethetics from the rear quarters anyway, of the Turbo GTS, the Phi Alpha 8 retained the exact geometry of the rear section, but an entirely new front end was made. which followed the print dimensions (talked about in the above Frame Development Section). New square tubing was used on the frame work that was taken from a scrap pile of old railings.
Prints were developed prior to welding up the Phi Alpha 8. These were concept drawings for proposed designs of gokarts. The designs were exercises in layout, aethetics and strength.
The unknown in this whole equation at this time was just where to put the front wheels. Phi Alpha 8 has the wheels way up front, but it was still plagued with the going straight when turning hard. I know, I hit my stomach on the steering wheel and promptly redesigned Phi Alpha 8.
Phi Alpha 8 had some unique additions. A larger 8 hp engine. A longer heavier frame. It Used the same exhaust from the Turbo Intercooled version, accept added two more exhaust outlets were added. If you look closely, you will see the same components, like steering wheel, seat, wheels etc… were retained. Snoopy even got a ride.
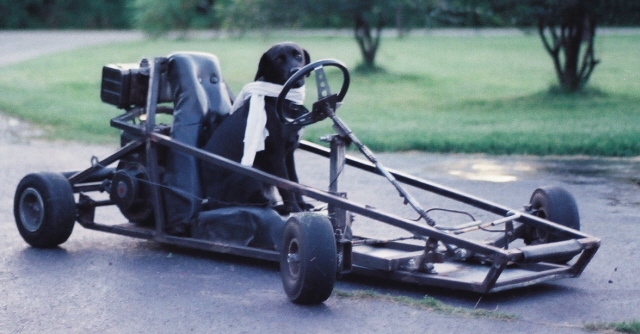
Phi Alpha 8 was to be fitted with a supercharger, but those plans never came about. The supercharger brackets existed, but were never used.
Go Kart #9 The 8 Horsepower Mega Cart
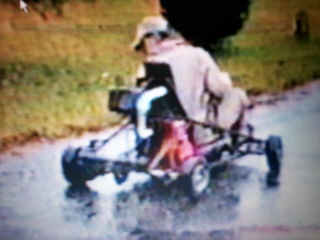
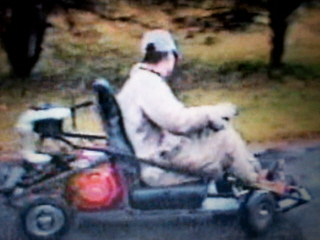
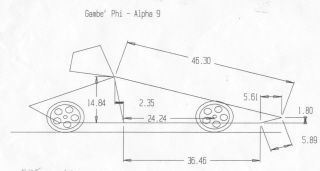
The Phi Alpha 8 was altered to be shorter changing its name to Phi Alpha 9, and is the version seen a video (which is currently not available yet). The following is a picture (from the video). Below is a print of the of the Phi Alpha 9 which was used in developing this gokart design.:
During the same summer that the Phi Alpha 8 was being tested, the Phi Alpha 10 was developed. What occurred was that I ran across a garage sale where a bunch of go cart parts were being sold for a mere $10. I could again, hardly contain myself as I brought these parts home.
I promptly began designing another frame and modeled this one more closely to the last frame design that the Phi Alpha 8 was to be designed after.
Go Kart #10 Phi Alpha 10
The Phi Alpha 10 received the most attention and by far has the most testing time of all the go karts. Having logged alone over 100 hours of testing the Phi Alpha 10 was the best design all around.
The concept drawing for the Phi Alpha 10 actually was the Mercure. The name was abandoned after once the Phi Alpha naming convention was chosen later that year.
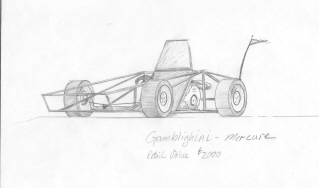
The mercure is actually a smaller gokart that was designed after the larger Motor Cycle engine version, which was never developed. (See the Gambighini’s That Never Were section for more details)
The first thing that most people noticed when they got in the Phi Alpha 10 was how comfortable it was. The previous go karts had been uncomforable, and some bone rattling. It was the aim of the Gamblighini line to make a product that would perform, look good and be comfortable.
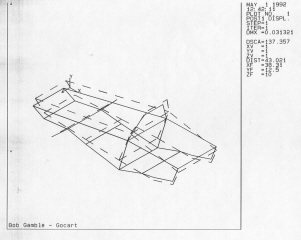
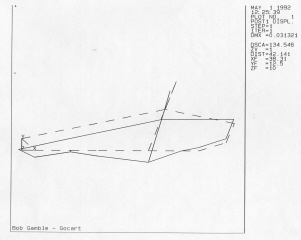
The Phi Alpha 10’s underwent Finite Element Analysis to determine if a 500 pound person would cause any damage to the frame. The analysis concluded that the frame would flex about 1/4 of an inch. Below are samples of the analysis:
The development included ergonomics and people positioning in the frame, as the following layout shows:
The original Phi Alpha 10 had a 5 horsepower Cast Ironed Lined Briggs Industrial motor on it. The larger tires enabled the Phi Alpha 10 to reach almost 40 mph at full throttle. This original Phi Alpha 10 was never supercharged.
In the summer of 1993 the Phi Alpha 10 was sold in Carpentersville IL along with the Phi Alpha 9. Both go karts have not been seen since.
The last I heard he Phi Alpha 10 was under a tarp in someone’s back yard.

Go Kart # 11 Supercharged Phi Alpha 10
In the year 2000, the Phi Alpha 10 was resurrected. The old plans were dug up, the weld template dusted off, and a new Phi Alpha 10 was made. A nice visit to the junk yard, and a bunch of go kart parts were gathered. By the time the 4th of July came round the go kart was in running order.
For the first year, the Phi Alpha 10 used the old engine off of the Turbo GTS. The engine actually was 4 horsepower engine, so it was mildly underpowered. Because the engine had been bored out, the boring job was not done properly, or Briggs don’t like to be bored out, because the engine blew lots of oil.
One afternoon (I forgot to check the oil) the engine suddenly started running sluggish, and suddenly just halted and thunked. The engine had run out of oil and blew the rod. It also bent the cam shaft. So the engine was pretty much over.
A Tecumseh, snow blower engine was found at the dump (of course) and used extensively the first year the Blower/Supercharger was redesigned. The engine had lots of torque, but suffered in the top end category, because the flywheel was extremely heavy (designed for lugging through snow) and it vibrated uncomfortably.
Below is the first Phi Alpha 10 with the Tecumseh motor on it. The white pipe and the grayish looking supercharger are development stages.
The supercharger system shown was in development stages from the ground up. The target supercharger was one that could be bolted right onto any engine with minimal engine modifications. The easiest engine to supercharge is the Tecumseh, because it uses a bowl carberator that is very easily pressurized.
But the main target engine was a Briggs 5 Hp. So the final supercharged version is the Briggs 5 Hp, shown below.
Go Karts Being Developed.
The history of gokarts has been quite an eventful one. The final products the Phi Alpha 10 and the Phi Alpha 9 both proved to be great performers. But that is not the end of the road for the Gamblighini gokarts by any means.
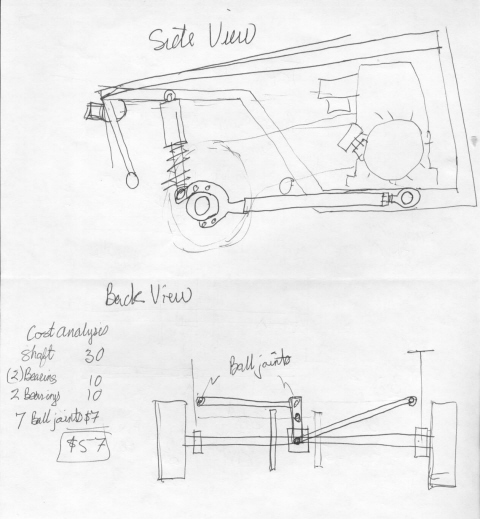
Rear Suspension System
The following is a rear suspension system using a solid axel. The reason for this is to keep the costs down, and the suspension simple. The design has yet to be proved out, and tested, but the concept is there. Feel free to try it.
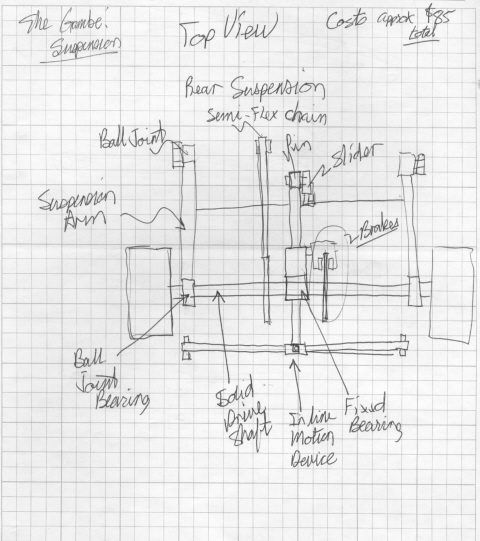
Frames to fit the Suspension system:
The key to all design is matching horsepower, strength, center of gravity, roll centers etc.. to get maximum performance.
More to come on frame designs!