By Go Kart Guru (Aka Gamblighini)
Making a homemade go kart can be a challenge. I have my 10 year old son badgering me to make a go kart with him. He is thinking that if I take this tire from here, a steering wheel from here, and an electric drill from here…I am all set. I just need to slap some wood together and “Walla instant go kart.”
I wish it were that simple. Actually, no I don’t wish it were that simple, other wise it wouldn’t be any fun.
Go Kart Plans and How To Make a Go Kart
Developing a Go Kart plans involves an 8 step process:
1. The Go Kart Idea
2. Engine Space
3. Person Space
4. Frame Layout
5. Steering Layout
6. CG Calculation
7. Stress Calculations
8. Finalize Parts and make them
Making a go kart, however involves a 12 step process.
1. Cut Each Tube Length according to the plan
2. Layout each part into the fixture
3. Combine the two frame halves
4. Position the Engine Plate, Engine and rear axle
5. Position the front steering system
6. Position the Steering Wheel
7. Place the Seat
8. Test for Correct Center of Gravity
9. Mount the Brakes and Brake Pedal
10. Mount the Throttle and Throttle Pedal
11. Mount the bottom plate
12. Test Drive
13. Take apart and paint
This article will discuss first, the go kart plan, and then next time how to make a go kart.
The first step with developing a go kart plan involves an idea. What do you want the go kart to look like. Go to web pages, grab ideas, and then come up with something you like for a go kart look. Trace it, or draw it on a piece of paper. Make it look relatively proportional, and be sure to include a full roll cage for maximum safety.
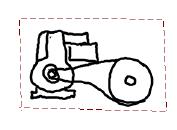
The engine space is literally a space that the engine and drive train fill.
Engine Space
This does involve an understanding of drive systems, so you should look around or find a drive systems book, if they are available. There is a balance between horsepower and sprocket size so a basic understanding is needed.
Often the one-wheel-wonder go karts use a 12 tooth sprocket on the clutch, and a 72 tooth or larger on the rear sprocket. This typically applies to go karts that have 12 inch diameter wheels. There are programs available on the internet that do these calculations for you and help you select the proper hp and gear sizes.
Person Space
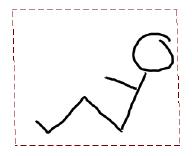
The next thing to figure out is the person space. This, again is the space where the person sits. It typically is separated from the engine space, so that the dangers of engine heat, spinning components is away from the driver.
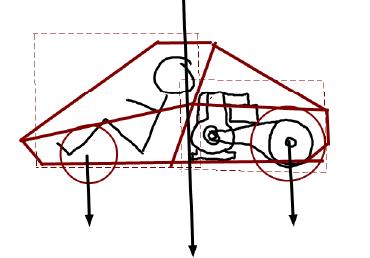
The engine space is fitted behind the person space and then a frame is constructed around the spaces. It is a good idea at this juncture to develop scale models using 1inch = 1 foot. Use these scale models and place them on a piece of paper. Begin drawing freehand around these spaces to develop your go kart frame.
Once the basic frame has been developed, place the steering system into the frame work. This will dictate the center of gravity placement in the go kart. This can be a little tricky, but need not be. There is the complicated way, which is more precise, or the simple way. The complicated way involves calculating the center of each component and then adding it together. We have a web page calculator that performs the center of gravity calculation for you automatically. The simple method involves laying out materials on the floor using scales. A basic look at the program will help you understand better the Center of Gravity calculations though.
Go Kart Plan Layout
We’ll talk about the simple method here: basically place all the components that are going to be used on the floor in their proper locations. Place the scale under the front wheel area and read the scale. Then place the scale under the back wheel area and read the scale. One thing of note, is that you need to be sitting in the system when it is being weighed, and you need to be in the location of where you would be when the gokart is assembled. This is pretty critical for the plans accuracy. Bottom line is that both scales should read the same or really close to the same. Add these two together and you get the full weight. Keep that number, because you will need it for your power calculation.
The stress calculations involves really selecting the correct material, so that the go kart doesn’t weigh a ton, or isn’t going to crack in half. Bottom line is that tubing that is 1x1x.078 thick is marginal on strength. You will find that it will probably bend, so be careful. A wall thickness of .100 is ample for strength, but it too must be supported in a truss orientation, otherwise, it too will bend.
The enemy of go kart frames is twisting, bending and cracking. Additionally, cracking can arise from bad welds, so when looking for cracks, go to the weld intersections first. And finally, cracks typically develop on the bottom side of the frame, or near vibrating engine, or steering mounts.
Finalizing The Plan
When you finalizing the plan need to make sure that the person fits into the go kart with ample foot space and head room. Additionally makes you the placement of the pedals is not interfering with your steering mechanism. One of the biggest mistakes that go kart makers run into is having the foot pedals interfere with the linkage. This interference occurs when the pedals are pushed all the way down. The pedal can cause the steering to lock up, this is a serious condition.
Finalizing the plan also includes making a scale paper model of the final go kart. Typically what I do is say find a bunch of old grocery bags and tape them together using masking tape. Then I scribe on the paper the go kart outline. A long word or a yardstick will help with the long lines that need to be drawn. Typically this go kart plan can be laid out on the basement floor on its side.
The Go Kart Guru is a go kart building specialist who has over 20 years of experience in building and designing go karts. The biggest challenge is to make a go kart out of junk or for less than 200 to 300 dollars. The go kart guru can show you how. Visit the Go Kart Building Bundle for a great value in go kart building materials. The go kart plans are included for free, in addition to a Superchargers manual that is included as a bonus product.

