Take a rear wheel off of a bike and remove only internal coaster brake mechanism pieces. Find some metal tubing that has an internal diameter of is and outside diameter that fits exactly inside the hub of the bicycle wheel hub. You may have to get creative here by inserting tubes within tubes to get the proper diameter that you’re looking for. Basically what you’re doing is inserting spacers that will ride up against the hub of the wheel. The spacers in turn will then rest on the axle. To keep the wheels into position, the axle has two holes drilled into it and bolts are inserted to guide the wheel from moving side to side.
The rear wheel is connected to the drive axle by a chain which is inserted between the spokes. When the axle twists a torque motion is exerted into the chain that in turn is yanked on against the spokes on the wheel causing the wheel to turn. The chain is not the only solution, however it is a simple and easy one. You may weld the shaft to the spacer/wheel hub however this is a permanent solution which renders most of the components pretty much trashed and will not be able to be used as bike components again.
To keep the axle from side sliding, another hole was drilled through the axle and the bolt is held in place. This prevents the wheel from sliding side to side in the axle from shifting sides as well.
A Word About Sliding Surfaces: make sure you buy or have on hand 3/4 inch style washers so you can use them as spacers or sliding surfaces. This will keep things from binding up when you’re riding the pedal go kart.
If you do not have a full section of three-quarter inch rod that will go the whole width of the go kart then you are going to have to adapt or make a coupler/adapter. I used piece of pipe union and basically pounded out the threads using three-quarter inch rod. I then used two bolts mounted at 90° to each other, this acted as a universal joint.
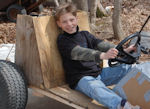
Note: the go kart that we’ve built has a high center of gravity and is not well suited to high-speed cornering. Be aware that there is a rollover risk with this particular go kart design and is very precarious at speeds over 15 to 20 mph. This is a pedal go kart and is not adaptable to engines in any way. The reason for this is that the center of gravity is mounted way high, the ground clearance is equivalent to that of a bicycle wheel, being approximately 12 inches off the ground.
The Drive Section
On the first try of our pedal go kart we use the small sprocket that is mounted on the rear axle of a bicycle. The problem with this is that the amount of torque required to move the go kart was tremendous. A slight incline of about 2° was enough to bend the pedal or crank arm. You can get a decent speed with the go kart, however the amount of force required to move the go kart is ridiculous.
The reason why the forces were so high to move the go kart is due to a number of factors:
– Weight of the Vehicle
– Bearing Surfaces
– Rolling Resistance of Drive System
The weight of the vehicle is a compromise between cheap materials and lightweight materials. Sure you could make a pedal go kart on titanium alloy or aluminum framework, however, this is meant to be a cheap alternative to those who do not have a lot of money but have plenty of plywood and two by fours.
The bearing surfaces of the drive system can be simple as we did where they are just greased joints inside wood holes, however if you want better performance you may want to add roller bearings which will cost a little bit more money.
The recommended drive system is to have a one-to-one drive. The way we did this was to take the crank mechanism off of another bike and use the crank plate/sprocket and welded to a tube that fit relatively snuggly around the three-quarter inch shaft. The position of the sprocket was space so it is not rub against the side of the framework and then was held in position by a crossbolt.
The downside about this drive system is there is no coaster or freewheeling where the go kart can move forward and the pedals don’t move. Freewheeling clutches are available on the market and can be found at the following link:
http://www.mcmaster.com/ – 2489k6/=3sta9i
You will have some issues on mounting the sprocket to these freewheeling clutchs. A special housing will need to be developed and a means to transmit torque through the housing of the roller clutch will be needed as well. Use of welding will not work in this application, because it will melt inside roller cage mechanism.
As you can see it’s not all just straightforward and it gets a little complicated that is why we decided to stick with the simple pinned linkage.
The chain system is contained within the body of the framework. The reason for this is that the width of a bicycle is about the width of a 2 x 4 and so the chain mechanism needs to be either contained inside the framework of the go kart or on the out side. We opted for the drive system inside the body of the frame to gain strength and so that we did not have to make custom 2 x 4 boards. The way we did things made it a little bit more complicated, however we got it to work anyway.
The chain we used was a number 40 agricultural chain that we bought at a local farm equipment store. But we found is that the chains that were available on the bikes were not long enough. We also thought that perhaps using the wider number 40 chain would be better for tracking the chain and will we would have less headaches than with the original thin bicycle chain.
The chain was held in this track by good alignment, however the alignment would not by itself to trick, because there is a large catenary in the return line of the chain system. To correct this we added a simple 2 x 4 crossmember that the catenary would rub against. This catenary tension system may also contribute to the drive line system friction, so a better mechanism may be a roller skate for maintaining tight return line.
The chain has to go through a tunnel so that there is adequate support for the crank housing. There are tremendous forces in 360° a motion for the crank mechanism. The most severe loading being at the forward strokes. This causes the housing to be cranked up and down, and side to side, and forward and back. The effect is to wallow out the position that it is in. To get around this we used to U-bolts to attach the crank housing to the main wood support network. The crank housing additionally was wedged into position using a wood wedge. For an extra torsional support the U-bolts were welded to the crank housing. This provided the stiffness needed to keep the crank housing from wallowing out and derailing the chain. The remaining flex is in the woods system which is supported internally to prevent it from twisting.