
Pine Wood Derby Go Kart
You may be wondering where the News Letters have been at?! Well been a little waylaid by the annual Grand Prix Pine Wood Derby race that we have at the Awana’s group every year.
It is the same panic every year. Get the car blocks/wheels/axles in a kit every year and then fabricate four different cars with some aspiration for authenticity and originality.
The panic comes in when we put it off until the last week before the race. And what is ironic is that all things start piling up all at once and it becomes one mighty stress attack.
We have managed to take home a trophy or two every year, so it has been worth the effort.
A word of advice about Pine Wood Derby cars: you can win in three areas: speed, design and bonding with your kids.
Unfortunately, when you rush things, the bonding part becomes a strangle every one about the neck, and it need not be.
So my past couple of weeks have been consumed in preparation, exhaustion, rework and plain, just taking a break. Sorry if you have been missing out.
This week, though, I thought we would go through what it takes to make a winning Pine Wood Derby race car.
Like I said before, you can win in speed and design, and the third actually is authenticity ( or the amount of work the child actually does.)
To start with, a relative design layout is needed. I encourage my boys to come up with ideas a year in advance. When the race is over, they are already mulling over new designs.
Designs can be complicated or simple. The actual design wins you nothing as far as speed, it just makes the car look good. There is no magic design that has better aerodynamics because the cars do not get going fast enough to have air resistance be a factor. I have seen a plain-Jane block of wood, win the whole racing gambit, all because the axle/wheel set up was given the most attention.
So again, no design will win over another in speed.
Because I am a guy, we tend to go overboard on vehicles. If something is going to race, we want it to look like a car, not a hot dog or a banana. Not that there is anything wrong with weird looking cars, but that is just not where I go.
Pine Wood Derby Blank. The shape is the maximum size that the block can be.
What we did however, is find out the maximum dimension of the car and put a full size template in the computer. I then print them out 10 at a time and have the kids draw up at least 5 cars. On these templates.
Some more advance, and less creative ways to use the templates is to take a side picture of a matchbox car. Then I take the match box car and super impose it on the template in the computer, and then print out several full size color templates.
When the designs are complete, I make sure that I scan the designs and store them in the computer, in case we wreck the template, or goof up on the car design.
This is a hand drawing of a Duesenburg look like that we found on the inernet
The next step is to take the template and using boxing tape and tape it to the block.
Then we proceed to cut it out on the band saw using the template as the guide.
For those car designs that are taller than the block, set up pieces of wood from a scrap piece of two by four and then glue it onto the standard block. Make sure the width is correct. Use a table saw for best squareness and overall width dimensions.
(Keep in mind that weight will be a factor when the blocks are glued together. In fact, as a rule of thumb, when gluing a section on to the top of the standard block, the overall weight will be over by almost 35% and will have to be hogged out later.)
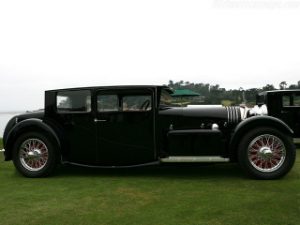
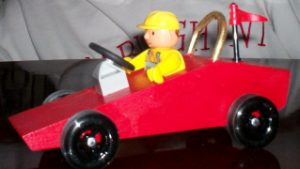
We found this picture on the internet of a Duesenburg looking car. We then did our best to imitate this design into the pine wood blank (shown above).
Once the cars have been cut out in the 2-d plane, the 3-D touches need to be added. I use the planar or mirror method to develop the 3-D contours of the vehicle. If I am working on one sides slanted window section, I work right away on the slanted section on the other side and keep going back and forth until they are equally matched.
The general progression of a vehicle is to get all the massive contour changes in the works right away. Use a dremel tool to do deep cuts, using the dremel like pencil. Keep in mind the dremel kicks up a lot of dust, so where safety glasses to keep your eyes clear. Also, a breather mask is helpful especially when hogging a ton of material out.
I use a wide range of hogging tools:
Dremel
Palm Sander
Triangular Head Sander
Belt Sander
The dremel is handy for gouging actions, where as the belt sander is great for hogging off a ton of material (such as a slanted window section on the side of the car). The palm sander is more useful for finalizing the design and getting things smooth. The triangular sander works in tough small cornered sections.
Once all the overall body sanding has been accomplished a good coat of sanding sealer is needed. The point of sanding sealer is to prevent you from getting a grainy looking surface. What occurs is the sanding sealer pulls out the grains and then requires that the sanding sealer be sanded off. A second or even third coat of sanding sealer is required to make the grains disappear. A relatively professional or very smooth surface will appear when using sanding sealer.
As you can see, the stress will be on if you are trying to cut out cars, sand, seal, sand reseal and then paint and then repaint and do this all in three days. You will have problems, the cars will not look good, and you will be very stressed. Take the time, to do it right.
Once the sanding sealer, and the surface looks like a glossy mirror, then you can start painting.
Here is the big mistake that most make and that is not to have a dust free environment. Make sure all the sanding dust is cleared from the area. Sometimes what is needed is to do the painting in an entirely different room.
There are several methods for painting. One is using a brush, another is to use a professional compressor set, or to use a spray paint can.
If you are a novice, and this is your first time, use a spray paint can. The results are outstanding. You have a wide variety of choices, and the nice thing is the can will probably be able to be used the next year.
A word of caution, don’t try to paint it all at once. Don’t try to paint it thick and finalized all at once. Keep in mind that you want a couple of times to paint the car. Paint it at least three times. The first time is just to cover the wood. The second time is to fill in. The third time is to finalize the coats.
If you are a fanatic about the design, you may put a clear top coat on the paint. This prevents it from being damaged as easily and absorbing hand oils, and secondly it makes it shine more.
If this is your first time, just use a simple spray paint can. You will be amazed at how well a metallic black, or a metallic blue looks deep and reflective. It just is fantastic!
Finished car complete with brass strap. Simple screws and silver paint were used to get this car into winning form.
Now you may be thinking, hey that was just one color, what if I want multiple colors? Well if you want more colors, then you need to get creative with tape or masking templates. I typically keep it simple and use a small tipped magic marker and draw in the car doors, windows, vents, light ect. I then paint in between the lines the windows (typically a nice light blue) and the taillights (a nice light red, with a touch of white for the reverse signal) the head lights (a white with a tinge of blue)
But lets not get ahead of ourselves, we need to get the wheels on.
Typically the blocks will come with wheel slots already sawn into them. I have seen where guys take a drill press and drill into the block for the wheels. Trouble with that method is you need to have everything all squared up, and the most especially the wheel height at the correct spot. The nice thing about the slot is that the wheel height is correct already, it just has that off chance that the sawn slot is not square with the body.
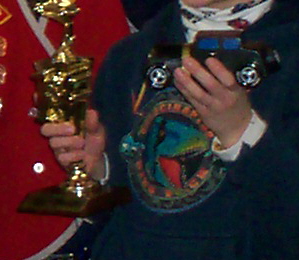
Duesenburg Car Won Award for Design
I am here to let you know that a car driving down the track with it going partly sideways, really doesn’t matter. What does matter is that the slots are parallel. If they are not parallel, then the car will tend to smack into the center guide. This is a no-no.
But for us laymen and those with minimal time, there is one thing to be assured about, the slots in the blocks are typically very parallel. So drilling your own holes is not really necessary. What is necessary though is that the wheels are:
1. Square to the slot
2. Parallel to front and rear slots
3. Free wheeling –free wheeling – free wheeling.
Did I say free wheeling!?
The key to winning a race is mostly free wheeling. Also, you need to keep the wheels as square to the track as possible. I have experimented with using the corners of the wheels as the contact for the track, however, this exerts a side load on the axels/hubs and actually causes more friction.
The least friction is accounted for by:
1. Removing any burrs on the axles
2. Remove and burs on the hubs
3. Provide clearance between the body and the wheel
4. Make sure the wheels do not rub on the body
5. Polish the shafts
6. Provide a liquid lubricant if allowed (make sure it does not degrade plastic – WD 40 works fine for race day, but works terrible a year later) – Silicone spray is best
7. Do not use grease, it has a higher viscosity than oil and will add friction.
8. Graphite works well, but works better if the polished axels can hold the graphite in the grooves of the polish marks.
The most important steps are at the first. Burrs are the enemy and cause the most headaches. Some of these axels are pounded out on presses and have burs that are left on them. To remove them, simple mount the axel in a drill. Spin the drill up and hit the side of the axle with a file (not fingernail file, but a real metal file that has a fine rasp to it). Be sure to hit the axel head with the file a couple of times.
Secondly, the burs in the wheels can slow the wheel down. The wheels are molded and flashing can result especially in the axel hole. Take a sharp knife and remove the burrs from the edge of the hole. Another method is to use a drill run it through the wheel. The danger in doing that is that the wheel hole will become too large and wobbly.
A high tech method for making the wheels tighter in tolerance is to use a gerrila glue and allow it to penetrate the hole. Let is set, then pull the wheel off. There will be a coating on the shaft that is thousands of inches thick. Coat this material with graphite powder. Then put the axel in the drill, polish it gently, recoat with graphite. Then assemble the wheel into the vehicle.
This takes a lot of work, and is not really required, but it does help keep the car from wobbling.
Mounting the axels is the most important part of the car and can be messed up severely is not done correctly.
Typically the axel is laid in the slot, but sometimes the slot is too tight. Do not force the axel, but get a drill bit that is the exact size of the axel and gently drill it into the bottom of the slot. Then put a drop of glue on the central section of the car, not any where near the wheel or body section.
All that is required is that the axel stay put and not come out of alignment. Get all four wheels mounted on the car, then place the car up right on a very flat surface. All wheels should touch squarely, for best tracking. Also, not wheel should but canted up at an angle just to make it touch, It may have to be reseated if the wheel is not square.
And finally, make sure there is at least two credit card thickness (.090 or .100) of an inch between the body and the axel hub. This will provide clearance necessary to keep the car from binding up.
Let the cars sit until the glue is dried. When lubricating the axles, use a Q-tip coated with lubricant. Use of a spray can will cause the lube to get all over the car. Lubes will eat paint and the paint can fuse into the wheel areas, so be sure to keep the lube and paint separate.
Major headaches and paint runs will occur when using liquid lubricants, so use them sparingly and wisely. I typically will not do any lubing until race day.
The final touches to the cars can be conducted now. Any adding of flares, spoilers, extra windows, spare tire, you name it. Now is the time.
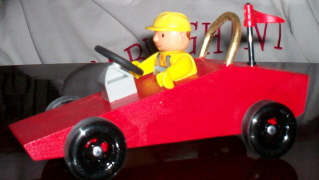
One year we made the Phi Alpha 10 (go kart from the plans) as a pine wood derby car. Complete with Bob the Builder!
The car must be weighed up and readied for pit day. During this period I have an old car that has won races sitting around. I have made a balance scale and I set the car on it. I put the new car on the opposite side of the balance. Typically we have to add some weight.
I have bought some bismuth tin alloy which melts at 185 degrees. What I do is drill a big hole using a 1 inch spade bit in the center of the car line, but usually forward. I then place screw in the center of the drill hole and then pour the molten allow into the cavity. Then I will weigh the car. It typically is too light with just one hole and two heavy with two filled up holes. But I will fill up both holes and then drill out using ¼ inch bit the remaining allow until the car matches, or is slightly heavier than the test car.
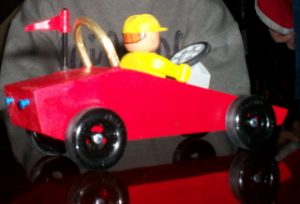
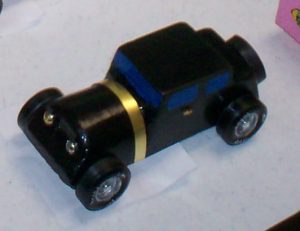
Phi Alpha 10 from the back side. This too won an award for speed.
It is better to be heavier, because taking away material is easier than adding material.
A word about weight placement. I have seen weight placed high and back, and I have seen weight place forward. The debate is that when high and back you get a kick start. If it is forward, the car may start slow, but will kick in at the end.
The best solution, is just behind the front wheels. This usually will get the car to pull out in the end. I will say that high is not ideal, but really, the wheels are the key, more so than the weight.
I have been wanting to make a computer program to analyze the whole situation, but you know….I only have so much time. Just take my word for it, get the wheel square and spinning and you will have a fast car.
So that about sums it up. Keep the car from being dropped on the floor, the wheels spinning, the car shining and you will have a shot at winning.
Now, this is the final word of advice, if you are going head to head with some large group of professionals, then don’t expect to win. They do things most of don’t like put their wheels on lathes (trying to remove the rotational inertia), insert the wheels with low friction materials…and the list goes on.
Find a small group and you will have a field day.
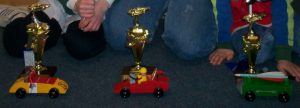
We won three different awards all for speed: 1st, 2cnd and 3rd….
Sorry it is not about go karts…. but you know, if a go kart wheel is dragging … .you won’t have much fun either.
Once again a great detailed post. You know your stuff and have me motivated to build one of these.